Antique garden urn restoration – how to make a latex mold to duplicate missing fancy pieces.
I got this antique, cast-iron garden urn on Craigslist. It was made in Philadelphia, probably around 1890, and is stamped – Adams and Storrie. (There is a little bit of history of their iron foundry at the end of my original post.)
At the time, I hadn’t been blogging very long so I did not think to take screenshots of the Craigslist ad, but the drawing (with measurements,) in the original post was all that was pictured. The guy wanted $200, which we paid. Paul tried to get him to come down in price, and I was like– please, we’re practically stealing this. Pay the man before the police show up.
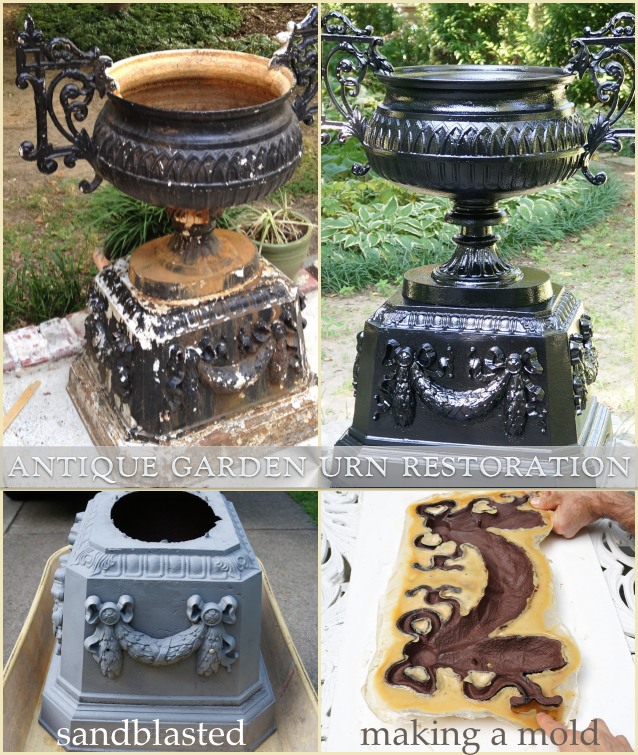
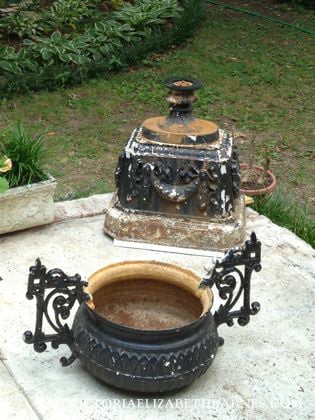
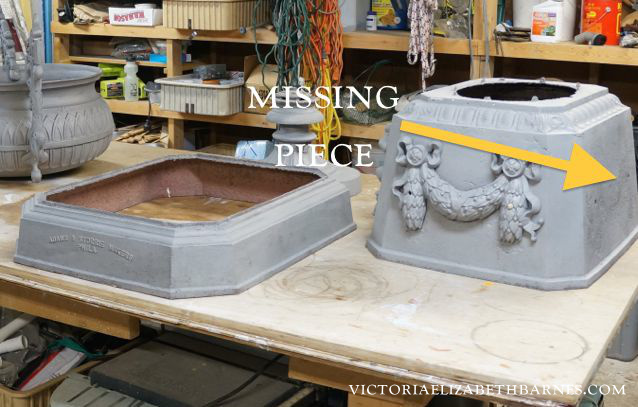
It had some issues– rust, layers of paint, and one of the decorative floral swags on the base was missing… As far as I was concerned, it was perfect.
I would have allowed its continued decomposition, but it turns out that Paul does not have my steely constitution for watching the death of an urn. It bothered him that the rust-situation was being permitted to progress unchecked.
Even though neither of us wanted to get involved in a restoration, there was really no way to fix the rust without stripping it down to the base metal… and if we were going to go that far, we might as well do a really good job.
I cannot overstate how much paint was on this thing… Black paint on top, white underneath, some green underneath all of that, rust all over.
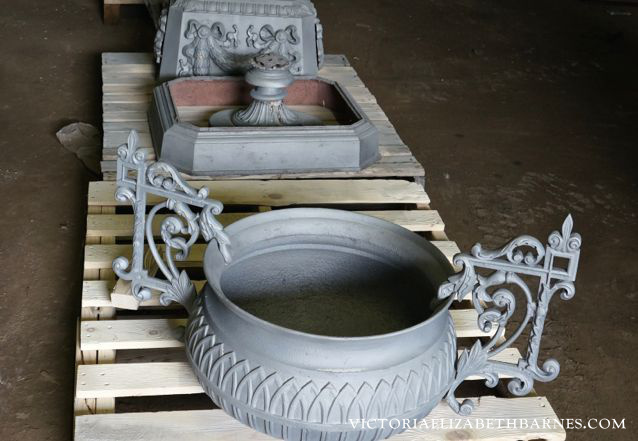
This was not a job for paint stripper and a wire brush — trying to get something this ornate with the scrolls and divots truly clean would have been a fool’s errand. So we took it to be sandblasted.
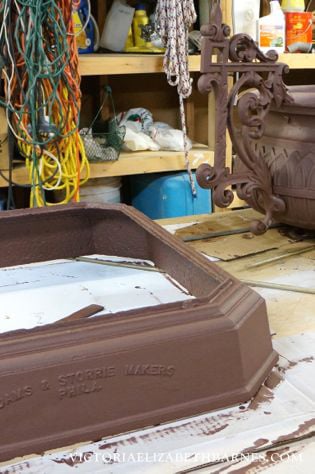
Below is when we picked it up after sandblasting. That gray color is not a primer, that is the base metal. It indicates a high amount of alloy, (*or something.)
*From now on, whenever metallurgy, chemistry, or electromagnetic fields are discussed, please assume there is a “or something” tacked on the end of it.
As I’ve collected it, I have had all of our patio/porch furniture sandblasted and then powder coated— powder coating is a process where first the item is sandblasted to remove all the old paint down to the bare metal. Then, the item is coated in a dry powder that is electrically charged, (*or something,) so that it clings to the metal. The powder is cured under heat and gives a very solid surface, like a car.
Depending on the metal, your results should be excellent, and generally I think the expense is worth it. For the urn though, the price to just have it sandblasted was huge. There is so much surface area to the pieces, and there was SO much paint/rust.
We ended up paying almost as much to have it sandblasted as we did to acquire it. At that point, having it powder coated felt like it would defeat the purpose of getting it cheaply to begin with.
On top of the expense, the other item I have had powder coated that was similar to the urn’s metallurgical composition, (*or something,) is also the one thing I have not been satisfied with the powder coating’s resiliency.
So between the expense and my uncertainty that I would be satisfied a few years from now, we decided to paint it ourselves.
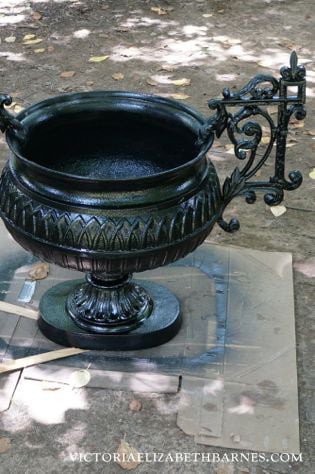
The first thing we did was paint everything with two coats of RustOleum primer. We had a quart of it and used a paintbrush to apply it. (Let it dry well in between coats.) Then we sprayed it with two coats of black gloss.
It has been outside for eight months now, and it still looks perfect. The key to a paint job lasting is making sure you are starting with a very clean surface. If you have anything loose or flaking, water will get in there and destroy all your hard work.
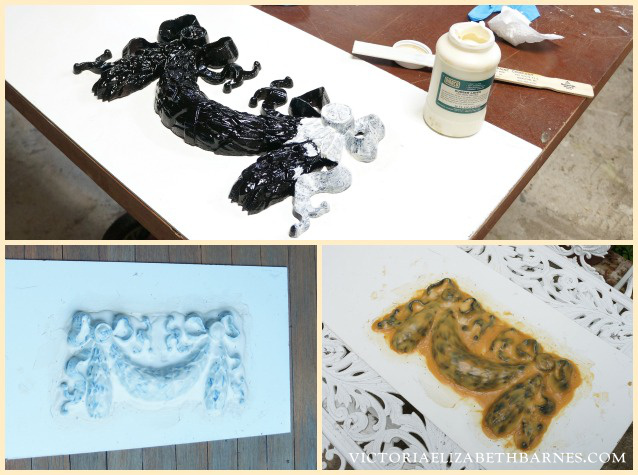
Now for the fun part – duplicating the missing, decorative floral-swag.
You need four things for this:
1. liquid latex/rubber mold maker.
2. a flat, slick surface that the latex will easily peel off.
3. paintbrush.
4. patience.
The latex is very thick, so you aren’t so much painting it on as you are glopping it on… It is going to take you a while to get enough coats of latex on whatever it is you are making a mold of. You need it to be sturdy, so more latex is better. You also want to let it dry thoroughly between coats.
I forget how many coats we did, but we went through two bottles of the latex mold stuff.
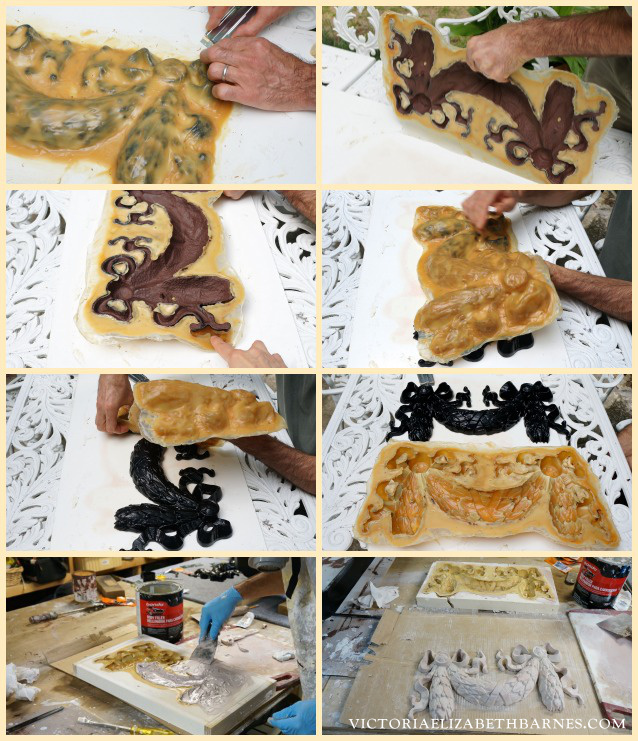
Once you have enough coats and it’s completely dry, it is time to peel the latex off. We used a window scraper to loosen the edges. Once we got it started, it peeled right off the white plastic board we used as a base.
When you start removing the mold from the actual piece you are duplicating, take your time. Be sure you are not ripping or tearing your mold.
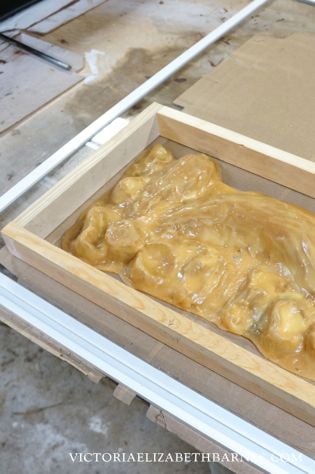
Once you have your latex mold, you need to stabilize it before you fill it. I guess if your mold was for something very small, it would not be a big deal. But because this swag was pretty sizable, we wanted to be sure that there was no movement while filling it.
This part was a little tricky. Ideally, we would have stabilized it before removing it from the original to be sure that it stayed in the identical shape, but there was no way to remove the latex without bending/moving it.
We ended up placing the freed-mold open-side-down on a piece of glass. Then Paul built a frame around it and filled the frame with plaster.
The glass let us look at the mold from underneath, to be sure all the edges were flat and everything looked proportionate before filling the frame with plaster.
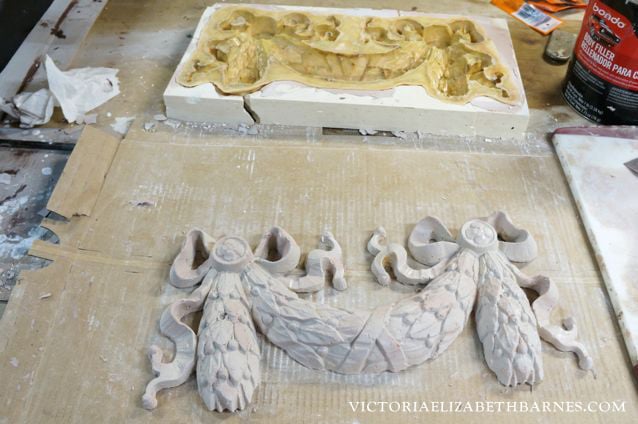
Once the plaster was dry, we had a very sturdy mold.
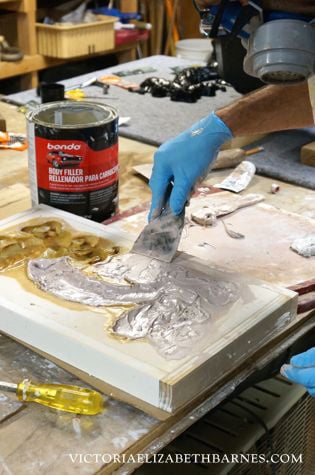
The material we chose to fill it was Bondo— the stuff they use to do body-repair on cars.
It worked perfectly but I will tell you that stuff SMELLS. I am pretty sure it will give you cancer in five seconds… I was out there briefly while Paul was working with it, and I could smell it for the next three days.
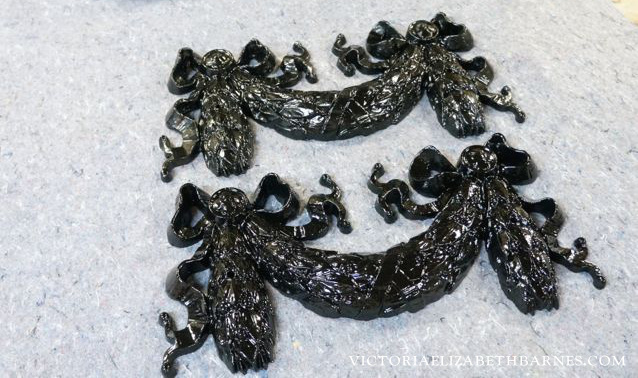
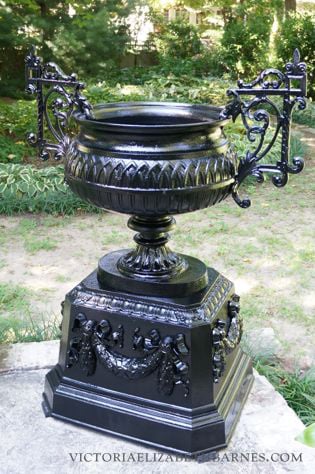
When painted, the two pieces were indistinguishable.
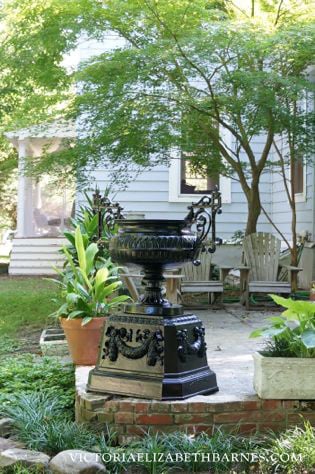
When we were finished, we had Brian come over to admire it. He said – are you going to plant something in it?
I was like – are you kidding? We just spent a month getting this cleaned up. The LAST thing I am going to do is fill it with dirt.
I cannot really say that I like the urn better, now that it looks brand-new. If anything, I kind of like it less. But it was still money well spent because it made me realize that rather than invest in a new patio… It is FAR better to spend money on GFTs and just disguise the patio.
This is what I call a win-win situation: we get to check the patio off our list of things to do. AND we get to buy more giant fancy things. I have no idea why it took me so long to come to this acquisition-justification.

May 13, 2014 @ 10:00 am
Darling, you know I adore you and all your crazy skills… but maybe we need to talk about waxing your arms?
You* (or whoever) went through a lot for this giant old (now-new-looking) thing!
May 13, 2014 @ 10:03 am
What a fabulous restoration. And a great tutorial on how to do it. I recreated a foot to a French dresser using bondo and like to have died over the smell and headaches I had for a week. Thanks for sharing how you made your mold, on a larger piece that is awesome!!
May 13, 2014 @ 10:08 am
Absolutely gorgeous! I have to admit also being partial to the pre-restoration state, but looks like it will hold up better in its shiny new state!! Also, great thinking of you (or Paul) to *not* make the plaster stabilizing-part of the mold till *after* you get the original piece out of the mold. This is the kind of project I would accidentally do the stabilizing plaster too early and then not be able to get my original piece out without ruining the mold… *_*
May 13, 2014 @ 10:09 am
I’m betting that sucker weighs a ton and a half!!… I would put a protective liner into it and then just drop in a hanging [minus the hanger stuff] basket of ferns or something.. that way you don’t have it filled with dirt…. We’ve done this for several years in various pots in our yard.. the only thing is you do have to be consistent with watering and fertilizing… but you sure have a much better selection of craiglist stuff than we get out here in the boonies… But then again, my cousin did furnish her first apt in NYC by cruising the high rent district for stuff left on the curb….
You go girl!! ps… your hubby is super awesome!!
May 13, 2014 @ 10:14 am
Wow! It looks Great! What a wonderful job! So much patience! Love it!
I would want something planted in it, lol!
May 13, 2014 @ 10:17 am
I once used this latex procedure to repair a chess set that I had ordered on ebay that the seller didn’t bother to protect when shipping that arrived sounding like a box of broken Christmas ornaments. I was so mad I wished him herpes, but my repairs came out really good. Your urn looks beautiful.
May 13, 2014 @ 10:20 am
Kudos for the restoration, even though I must say, I do love me some of that pre-fix rusty-peely finish. Your work preserved it for another hundred years, and the tutorial was truly an eye-opener. I had no idea that was even possible. You totally are the urn-whisperer!
May 13, 2014 @ 10:41 am
Wow great job! The thing is if you leave it unfilled it will fill with dust and dirt and rainwater, which will attract mosquitoes to lay in it, perhaps fill with water with a couple of gold fish (if the paint is suitable) and a water Lilly so that the fish eat the bugs and you have a water feature and the magnificent pot to show off… Just a thought…
May 13, 2014 @ 10:45 am
You’ll have to put your ashes in it when you die.
May 13, 2014 @ 10:58 am
Yes! This!
(You do know I was kidding about your hairy arms, right? I’m sure they belong to Paul)
May 13, 2014 @ 11:16 am
The urn looks fantastic! I wish I had one! And I agree totally about putting dirt in it, but I would probably put in a container arrangement. Something with tallish spiky grass, medium-height color, and then blue lobelia and some light-colored viney things spilling downward (like decorative sweet potato vines or something). But definitely NOT planted directly in it.
May 13, 2014 @ 11:17 am
QUITE impressed by your willingness to go through this process. That must have taken a lot of patience and here I was thinking you were a little like me in being impatient ; )
May 13, 2014 @ 12:26 pm
Paul gets all the credit for anything actually getting finished…
May 13, 2014 @ 11:20 am
This is amazing!
Do you have any recommendations on how to find a good place to do the sandblasting and powder painting?
I have a glider rocker that I’d like to have done….but I’m not sure where to start!
May 13, 2014 @ 12:30 pm
I found mine about five years ago… (I guess I must have googled powder coating.) I called around and got estimates.
The place I ended up using had a website that had before and after pictures of their work, AND I was able to email them photos of the patio set I was working on at the time… All of that combined made me feel like they would do a good job.
You could also ask any friends who are into cars or motorcycles… Sometimes they will know where you should go.
May 13, 2014 @ 11:26 am
I’m always impressed with the knowledge you and Paul share on how to repair, move or improve items brought to your Victorian. There is no way Mr. B or myself would have had an inkling on how to recreate the missing piece on the urn. It definitely looks identical. I would have kept it rusty and watched with glee as my $200 purchase disintegrated of rust damage over the years.
🙂
Maybe after a few years you’ll soften on wanting to put some wonderful plants in it. You know, like after the new-urn smell dissipates? It is a showstopper for your patio.
xo,
Karen
May 13, 2014 @ 11:30 am
The only problem with your fabulous finds in this instance is they make a glaring contrast between GFT and the not quite so fancy patio. I know if you stand back and stare long enough at that Urn you will come up with something that rises to the elegance of the Urn, preferably from Target or the dollar store( keeping in mind the budget) Maybe its the lack of furniture ,pillows, an umbrella and a Marine serving mint juleps that would complete the vignette. Of course I forgot (living in Virginia) that your area just emerged from its own ice age. Very impressed with your descriptive abilities and I second the waxing suggestion TeeHee…………………
May 13, 2014 @ 12:31 pm
“a Marine serving mint juleps ”
this is why I love you all… and yes, the ice age has JUST ended.
May 13, 2014 @ 11:31 am
This is probably one of my favorite GFT’s of all time…well, except for maybe the kingdom mirror…which I’m not the least bit shy about coveting openly. Move to Illinois….I need a friend like you to do this crap with….or at least come for a visit…I’m pouring concrete in the dining room for the new fireplace hearth and you KNOW that you want to be a part of that (and the subsequent electrical trim out).
Go ahead, admit it….it’s not as cool as a restored garden GFT but pouring concrete in the dining room IS kind of sexy.
Well done, girlfriend! xo
May 13, 2014 @ 11:45 am
I can just see some one flicking their cigarette ashes in the urn!! Put some flowers in it!! Love your stories….whatever happened to the BIG BED??
May 13, 2014 @ 12:41 pm
We did finally get the bed put together – http://victoriaelizabethbarnes.com/retrofitting-antique-bed-frame/
May 13, 2014 @ 11:51 am
There seems to be a misconception here about the effect of rust on cast iron, which is very different from steel. Due to the high carbon content of gray cast iron, the surface rust itself forms a protective layer, and any further oxidation happens very, very slowly. Unless you desire a painted surface, there is really no structural need to remove the rust. The urn would not disintegrate because of rust, at least not in any of our lifetimes, though it would bleed orange onto your lovely patio.
May 13, 2014 @ 12:38 pm
I did not know that!! The part Paul was concerned about, (you can kind of see in the photo where we had just picked it up from the sandblasting place) was the stem… It could not have deteriorated any more and still supported the bowl.
May 13, 2014 @ 12:07 pm
Tammigirl you did make me laugh outloud!! But the Urn is absolutely at home!
May 13, 2014 @ 1:43 pm
Do you mind sharing who did your sandblasting and powder coating? My cast iron radiators are in pretty sorry condition – like someone dropped joint compound on them and then painted over it, so I might want to have at least 3 of them sandblasted. I have a neighbor who highly recommends someone in Conshohocken.
Side note: sandblasting probably will make keeping the radiators officially more expensive than replacing them with forced air and having central air conditioning would have been. But I’ve always coveted my neighbors’ cast iron radiators. No regrets, right?
May 13, 2014 @ 1:50 pm
I WANT this. It is absolutely fabulous. Good–no, wonderful–job!
May 13, 2014 @ 2:33 pm
I don’t know which I like better, the terrific ideas and creative things you do, or the way you write about them. You are very entertaining.