Antique garden urn restoration – how to make a latex mold to duplicate missing fancy pieces.
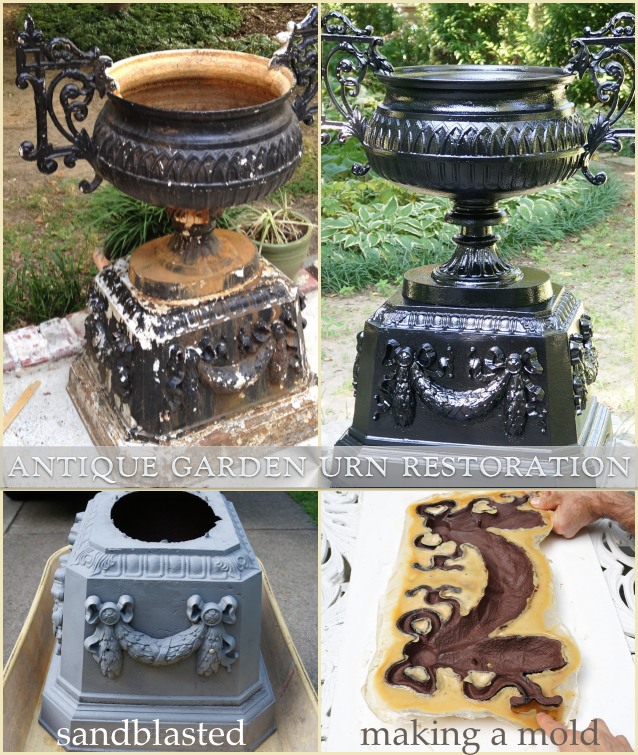
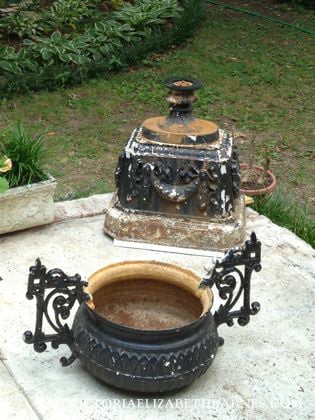
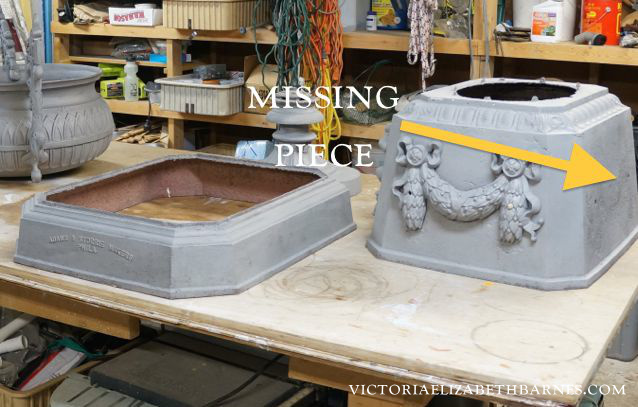
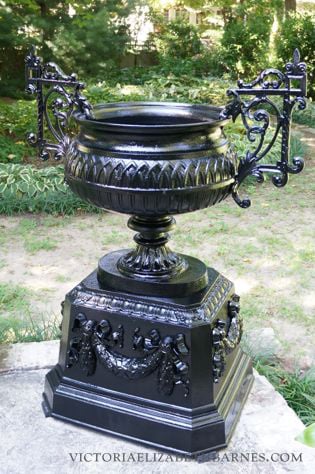
I got this antique, cast-iron garden urn on Craigslist. It was made in Philadelphia, probably around 1890, and is stamped – Adams and Storrie. (There is a little bit of history of their iron foundry at the end of my original post.)
At the time, I hadn’t been blogging very long so I did not think to take screenshots of the Craigslist ad, but the drawing (with measurements,) in the original post was all that was pictured. The guy wanted $200, which we paid. Paul tried to get him to come down in price, and I was like– please, we’re practically stealing this. Pay the man before the police show up.
It had some issues– rust, layers of paint, and one of the decorative floral swags on the base was missing… As far as I was concerned, it was perfect.
I would have allowed its continued decomposition, but it turns out that Paul does not have my steely constitution for watching the death of an urn. It bothered him that the rust-situation was being permitted to progress unchecked.
Even though neither of us wanted to get involved in a restoration, there was really no way to fix the rust without stripping it down to the base metal… and if we were going to go that far, we might as well do a really good job.
I cannot overstate how much paint was on this thing… Black paint on top, white underneath, some green underneath all of that, rust all over.
This was not a job for paint stripper and a wire brush — trying to get something this ornate with the scrolls and divots truly clean would have been a fool’s errand. So we took it to be sandblasted.
Below is when we picked it up after sandblasting. That gray color is not a primer, that is the base metal. It indicates a high amount of alloy, (*or something.)
*From now on, whenever metallurgy, chemistry, or electromagnetic fields are discussed, please assume there is a “or something” tacked on the end of it.
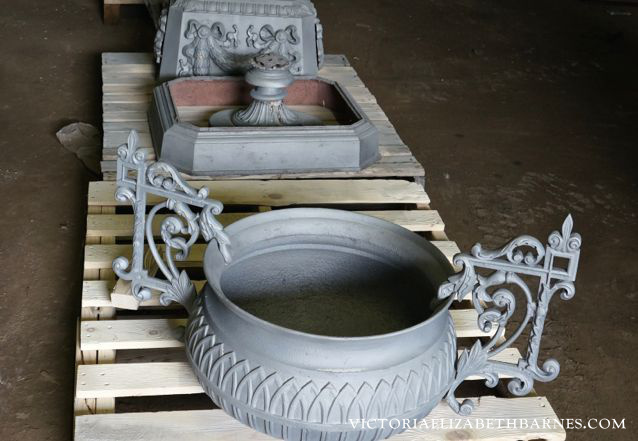
As I’ve collected it, I have had all of our patio/porch furniture sandblasted and then powder coated— powder coating is a process where first the item is sandblasted to remove all the old paint down to the bare metal. Then, the item is coated in a dry powder that is electrically charged, (*or something,) so that it clings to the metal. The powder is cured under heat and gives a very solid surface, like a car.
Depending on the metal, your results should be excellent, and generally I think the expense is worth it. For the urn though, the price to just have it sandblasted was huge. There is so much surface area to the pieces, and there was SO much paint/rust.
We ended up paying almost as much to have it sandblasted as we did to acquire it. At that point, having it powder coated felt like it would defeat the purpose of getting it cheaply to begin with.
On top of the expense, the other item I have had powder coated that was similar to the urn’s metallurgical composition, (*or something,) is also the one thing I have not been satisfied with the powder coating’s resiliency.
So between the expense and my uncertainty that I would be satisfied a few years from now, we decided to paint it ourselves.
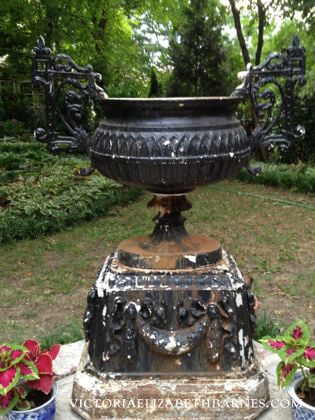
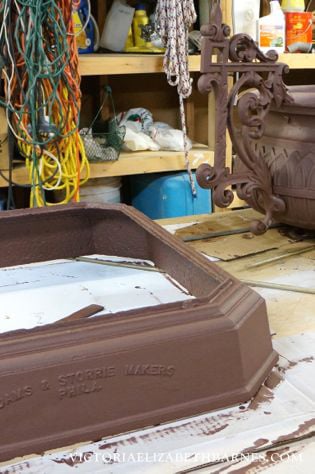
The first thing we did was paint everything with two coats of RustOleum primer. We had a quart of it and used a paintbrush to apply it. (Let it dry well in between coats.) Then we sprayed it with two coats of black gloss.
It has been outside for eight months now, and it still looks perfect. The key to a paint job lasting is making sure you are starting with a very clean surface. If you have anything loose or flaking, water will get in there and destroy all your hard work.
Now for the fun part – duplicating the missing, decorative floral-swag.
You need four things for this:
1. liquid latex/rubber mold maker.
2. a flat, slick surface that the latex will easily peel off.
3. paintbrush.
4. patience.
The latex is very thick, so you aren’t so much painting it on as you are glopping it on… It is going to take you a while to get enough coats of latex on whatever it is you are making a mold of. You need it to be sturdy, so more latex is better. You also want to let it dry thoroughly between coats.
I forget how many coats we did, but we went through two bottles of the latex mold stuff.
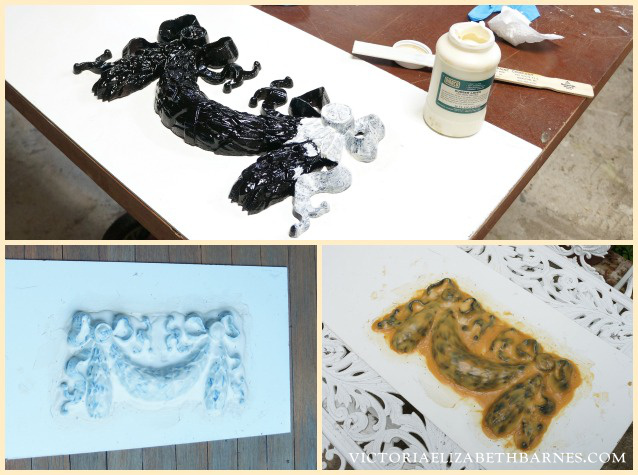
Once you have enough coats and it’s completely dry, it is time to peel the latex off. We used a window scraper to loosen the edges. Once we got it started, it peeled right off the white plastic board we used as a base.
When you start removing the mold from the actual piece you are duplicating, take your time. Be sure you are not ripping or tearing your mold.
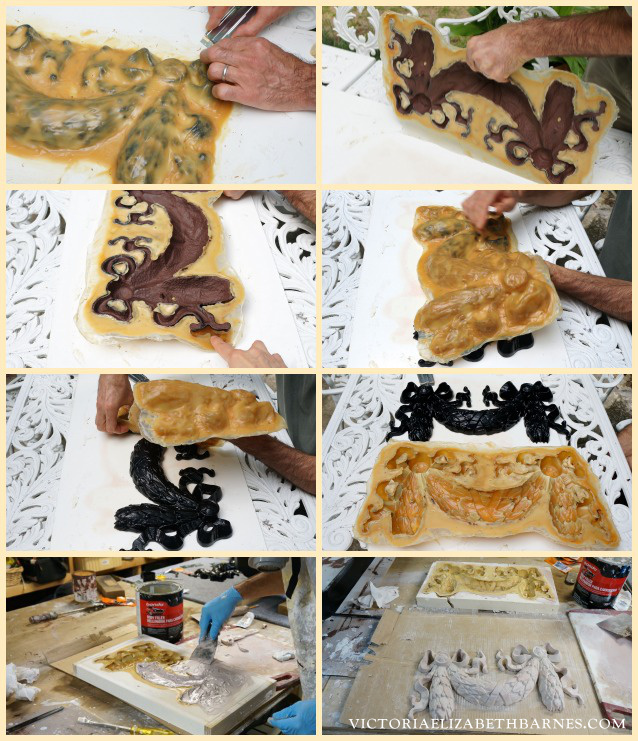
Once you have your latex mold, you need to stabilize it before you fill it. I guess if your mold was for something very small, it would not be a big deal. But because this swag was pretty sizable, we wanted to be sure that there was no movement while filling it.
This part was a little tricky. Ideally, we would have stabilized it before removing it from the original to be sure that it stayed in the identical shape, but there was no way to remove the latex without bending/moving it.
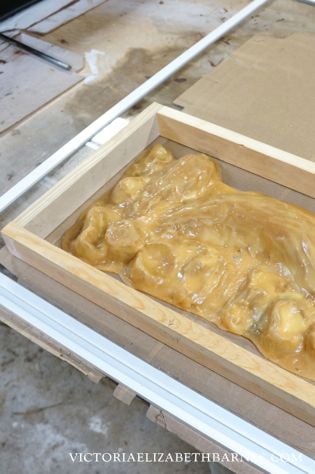
We ended up placing the freed-mold open-side-down on a piece of glass. Then Paul built a frame around it and filled the frame with plaster.
The glass let us look at the mold from underneath, to be sure all the edges were flat and everything looked proportionate before filling the frame with plaster.
Once the plaster was dry, we had a very sturdy mold.

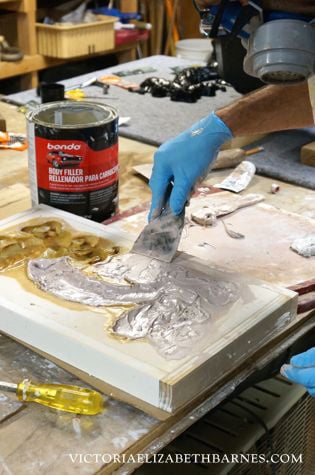
The material we chose to fill it was Bondo— the stuff they use to do body-repair on cars.
It worked perfectly but I will tell you that stuff SMELLS. I am pretty sure it will give you cancer in five seconds… I was out there briefly while Paul was working with it, and I could smell it for the next three days.
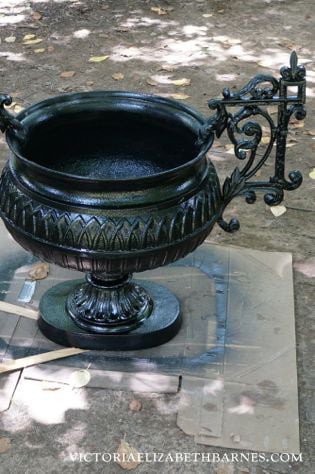
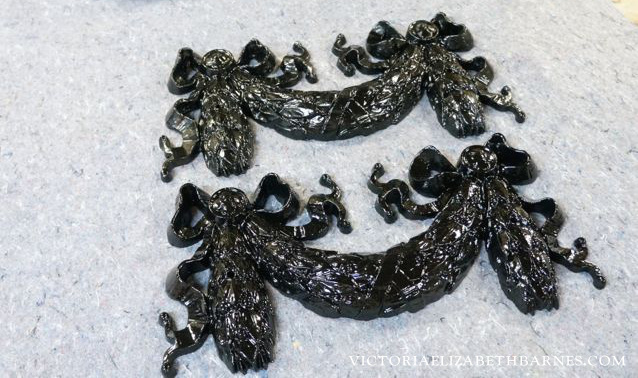
When painted, the two pieces were indistinguishable.
When we were finished, we had Brian come over to admire it. He said – are you going to plant something in it?
I was like – are you kidding? We just spent a month getting this cleaned up. The LAST thing I am going to do is fill it with dirt.
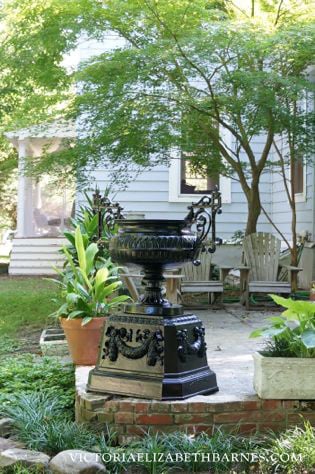
I cannot really say that I like the urn better, now that it looks brand-new. If anything, I kind of like it less. But it was still money well spent because it made me realize that rather than invest in a new patio… It is FAR better to spend money on GFTs and just disguise the patio.
This is what I call a win-win situation: we get to check the patio off our list of things to do. AND we get to buy more giant fancy things. I have no idea why it took me so long to come to this acquisition-justification.


May 13, 2014 @ 2:48 pm
On a completely unrelated note, you might want to pick up the most recent copy of Vanity Fair – the one with Don Draper on the cover! You will love, love, love it! I thought of you when it arrived in my mailbox…….
May 14, 2014 @ 9:02 am
I already tore off the cover and internal pages and taped them to the bedroom wall. Paul is so pleased.
May 13, 2014 @ 3:15 pm
Love this whole crazy restoration and mold. Without going into a chemistry seminar — the electrostatic part of powder coating …bla bla magic! Something something ionic bonding properties between the metal and the powder.
May 13, 2014 @ 4:04 pm
So, wait – how did you remove the floral swag from the base to make the mold?
May 14, 2014 @ 9:08 am
All of the swags were attached with brass screws, (which don’t rust) and amazingly, they actually unscrewed… We got something similar for the swag that was missing.
May 13, 2014 @ 4:13 pm
Do you have a giant Disco Ball to put in the top at Halloween?
May 14, 2014 @ 9:00 am
You KNOW I do.
May 13, 2014 @ 5:04 pm
I love that you go all in on things!
May 13, 2014 @ 5:14 pm
Okay, LOVE the restoration job. Way to go!
If you want the look of flowers in it without actually planting stuff then pick up a hanging basket, take off the strappy bits that make it hang and put it inside the urn 😀 I do that all the time! Easy, fast, cheap and no damage to the amazing urn.
May 13, 2014 @ 9:18 pm
Your tutorial is a keeper for sure.
Now, I’ll be out looking for things that are missing things so I can make a mold.
I hope you kept the mold. When I saw how great it looked, I immediately went to how it could be used to mold more wreaths to attach to, I don’t know, an outdoor fireplace, a seating area, or some other fancy thing for the patio.
May 14, 2014 @ 8:23 am
Gorgeous urn and great tute-one question how did you attach the cast iron and bondo swags?
May 14, 2014 @ 9:10 am
The three swags that were intact were held on with brass screws, (which don’t rust,) and we got something similar for the one we made.
May 16, 2014 @ 8:42 pm
just another take on the comments that the Urn now looks too “new”. I don’t know if any of you have looked at the pictures posted on line of stunningly beautiful mansions and abandoned buildings, some even filled with what seem to be priceless antique furniture, carpets and art work rotting away and forgotten. This made me sad enough to weep. I can’t believe that they at least wouldn’t have been stripped of their contents by someone. Any hoo the urn gave me the same feeling. That it had once taken pride of place in some lovely garden or the entrance to a grand home and it was dying out of existence-and now it has life and beauty again and will age again and perhaps some one in 50 or so years will rescue it again and that makes me smile.
May 14, 2014 @ 10:44 am
Your husband is way hotter than Don Draper…not that any of us are keeping score on the severe skill set sexiness of your husband.
May 14, 2014 @ 3:25 pm
wow! I’ll second that vote and let us not forget this manly man can Dance!this makes him as rare as GFT on my Craig’s list. Ours is devoted to giant ugly things and small disgusting things people no longer want and one wonders if anyone ever did-want them that is.
May 14, 2014 @ 12:41 pm
Good job on the restoration. You and your husband are way more adventurous than me and mine. Not knowing the best steps to get from point A to point B, but being an avid watcher of ‘How It’s Made’, I’m wondering if you did/considered any of the following: coating the original swag with a releasing agent (vaseline, silica, etc.); using packed sand as a base for the mold; selling the urn and using the profits as start-up funds for your own restoration business. 😉
Now that you do have a fancy swag mold on hand, will you now be using that to create Christmas and Birthday presents? The time and effort going into it demand a future use.
May 14, 2014 @ 8:33 pm
have you thought of maybe antiquing it, just so it is not sooo……i don’t know, shiny??
it looks brand new. maybe a mat finish or top coat or a light dusting of a green paint (which is then brushed off and only left in the corners or recesses of the edges ) to give it that ‘made in the 1800’s ‘ like of look??
looks fabulous but it now looks like it was made yesterday or last month….
i agree with you, the before looks better.
*shrug*
May 14, 2014 @ 11:54 pm
Hi Victoria!
I just read your Victorian Garden Urn post in earnest, then I wrote down how you did every step. I keep a binder with all kinds of “how to” goodies and decorating/interior/garden design stuff in it for future use. Thank you!!!
I have also heard that “Turbo Builders Bog” is another useful molding material. Still waiting to find my carved, wooden roses out there at some giant estate/company/tag sale that I can use to create all kinds of wonderful mouldings out of. (bad grammar, I know)
Happy hunting/creating!
Barb 🙂
May 16, 2014 @ 8:10 pm
Wow, this is really hardcore. How long did this actually take you, err, Paul to complete? A month, seriously? Guess that’s why your home looks fabulous and mine looks like a little cape cod.
May 17, 2014 @ 3:00 am
Really enjoyed reading about this project. The restored urn looks superb. Good work.
May 19, 2014 @ 10:31 pm
Love the urn, it makes my heart go pitty-pat and thrills me with its sheer giant fanciness. The black gloss is great, it’s SHINY. I’m in agreement with Suzanne, I will be looking for things to mold now LOL! Thanks for the inspiration!
May 22, 2014 @ 10:24 am
Confess! All this shiny stuff and garden sharing is to make us forget (or make Paul forget) there is a kitchen in waiting. (likely for savings to support its future fabulousness)
I don’t mind , I love to visit your garden and patio which has charm and beautiful indulged growing petals and this fabulous couple in residence . . . May I suggest you throw a party and LIVE in the house for a weekend. Restoration must be balanced by martinis and mint juleps, though i confess all the Marines at Camp Pendleton wouldn’t take me away from a dancing fellow who indulged my passion for swag. . . (in this case, we have something in common, though mine would draw the line at bondo and confines himself to a passable lindy hop!)
Hope the wintertime threw you for a loop news has resolved dahling.
May 30, 2014 @ 10:39 am
I was breathless reading about your find and the restoration project. Well done! Love your blog too. I think we all had someone like you nearby. You’re such a neat lady!
January 21, 2015 @ 9:19 am
Victoria, I love everything you do and I would not ever suggest doing something differently, normally, but YOU YOURSELF said you liked the urn better before so, uhm…. what about doing a finish on you finished urn? Like, res-praying lots of flat black, then some faux rust or patina here and there…or even doing a copper look with green coming in all over? I mean, I know you are already finished and would hate to repaint, but I’m sure your husband would not mind and has LOTS of free time on his hands…. I only suggest looking into this because my husband and I are re-creating a 1600,s English pub where there should have never been a 16oo,s pub in America….. and with effort (lots) and time (oh God, LOTS) we have managed to make what we are doing so far look older than old, even though it isn’t. So, just a suggestion that you don’t have to compromise on the old urns you liked. just sayin.
January 21, 2015 @ 9:26 am
oh….and don’t look for my website for our pics of a 1600s’ Pub yet…the website is not up yet and won’t be for awhile. Too busy working on it! LOVE yours, though! again, just sayin….
Nancy Will
May 29, 2016 @ 9:24 am
Hi! I love how you restored the urn. I do have a question about stabilizing the mold. Did you place the mold on top of the original piece and then fill around with the plaster? If not, how did you keep the mold from buckling and warping when adding the plaster to firm it? I love your blog! My husband and I are like you and Paul. We are restoring a 1945 Craftsman that was about to be condemned. Mt GFT is the fountain in the front yard. It is huge, and wonderful. We have been at it 1 1/2 years, and are starting our kitchen. It has been completely gutted, and now we are beginning the cabinets. Keep up the inspiring blog!