A video tutorial for making soil blocks – how to start seeds indoors.
Starting your seeds indoors is effort on the front end, but the benefits are worth it – your plants get a headstart on the season and your germination/growth rate will be better/faster because you can provide ideal conditions.
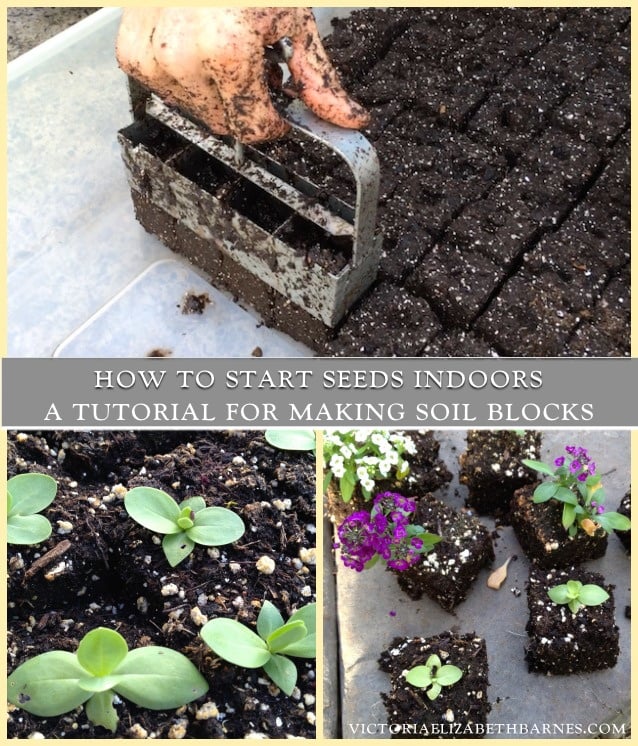
I use a system of soil blocks, plastic trays, heat mats, and overhead lighting… most of this is self-explanatory with the exception of the soil blocker– it’s a hand-held tool that makes nifty little soil containers for your seeds.
With soil blocks you do NOT need pots or anything else. When you are ready to plant your seedlings, they go right in the ground.
What you need for starting seeds indoors:
1. Fluorescent overhead lighting – you can get them at the hardware store, but don’t forget to check Craigslist first. (I do not buy the special plant bulbs, just the regular cheap ones.)
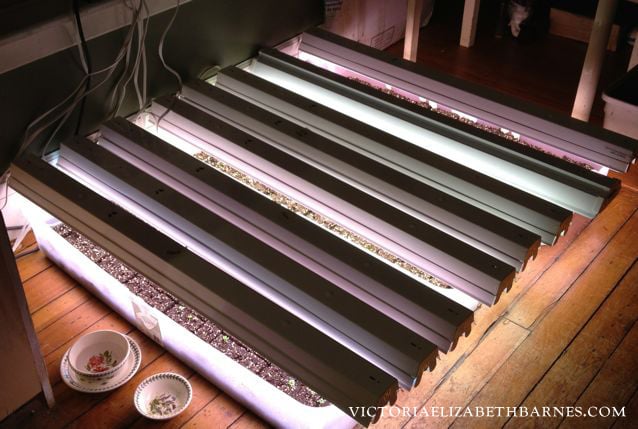
2. Trays for the soil blocks – I use an assortment of stuff we already had. (Those under-the-bed plastic boxes are nice and long and are about the same size as the fluorescent lighting.)
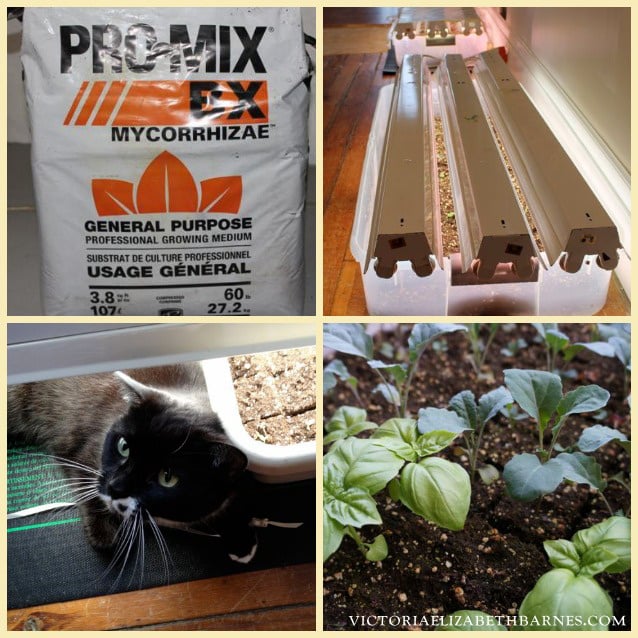
3. Soil mix – you can DIY your soil mix, but I buy a pre-made version called Pro Mix. I get mine at a local garden/farm supply store. I buy the big bale – 3.8 ft.³ (I have tried other brands when they are out of the ProMix, they are all pretty similar; just be sure it is labeled specifically as a seed-starter or growing medium.)
4. Soil block maker – you will probably have to order this online. You can buy soil blockers in lots of different sizes. I use the 2” x 2” for most seedlings.
FYI – you definitely don’t want to use something like Miracle Gro potting mix for starting seeds. In fact, you definitely don’t want to use Miracle Gro for anything… That stuff is bad for your garden and bad for the natural balance of the soil.
Okay. Let’s make soil blocks. You can watch the video to see all of the steps, but I will write them out below, in case you want to refer back.
How to make soil blocks:
1. Get a container large/deep enough to mix your soil and water. Mix WELL.
2. Wait a few minutes to see how much water gets absorbed… You may need to add more.
– You want your soil mixture to be fairly wet, when you squeeze a handful, some water should drip out.
3. Once you have the right consistency, take your soil blocker and make a few passes through the soil. Be sure you pack the mixture into the soil blocker, compressing the soil.
4. Place the soil blocker in the tray where you will grow your seedlings and press the handle to make the soil blocks.
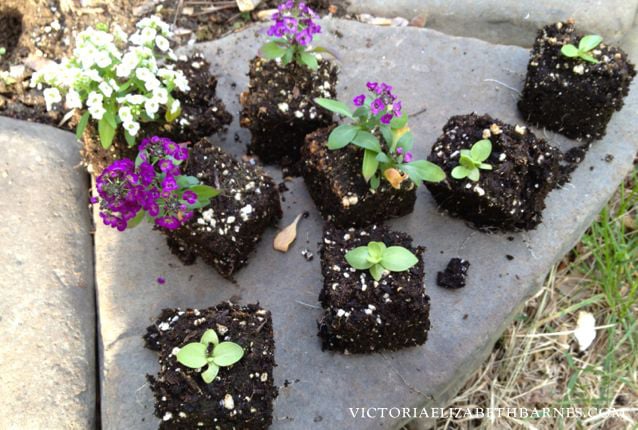
5. Plant your seeds in the soil blocks.
6. Place your lighting directly over the plants.
–You can see that if the bins are the right size, the sides give you an easy way to support the lighting.
–Depending on what you are growing and when you are starting the seeds compared to when you will be able to put them outside, this might be a good height for the entire process, or you might need to rig them up.
7. This is optional, but for seeds that really prefer warmth to germinate, you can use a heat mat to get them started. It makes a huge difference with how quickly my Zinnia sprout/grow but they will still germinate if you don’t use a heat mat. So, up to you.
8. Cover your newly-planted seeds. Usually, it is recommended that you use plastic… But in the last few years I have switched to old sheets, and it has worked just as well. You are trying to maintain an atmosphere that is moist and warm. Once the seeds sprout, you can remove the covers. But you still need to keep them watered. DO NOT LET THEM DRY OUT.
9. As the seedlings become more established, and as you get closer to the time when you will harden them off, you can let them begin to dry out between waterings.
10. Harden off. This means putting your seeds outside still in their trays, acclimating them to being outside. DO NOT STICK YOUR TRAY IMMEDIATELY INTO FULL SUN…Start a few days before you want to plant the seeds outside and gradually increase the time they are in full sun.
11. Depending on what you are growing, you may want to pinch your seedling to get a fuller plant with bigger flowers.


May 6, 2014 @ 9:57 am
that was all quite organised – what is going on?
May 6, 2014 @ 11:34 am
My thoughts exactly! Who is this woman and what has she done with Victoria?
May 10, 2014 @ 10:24 am
I considered prefacing the post with – “sorry this is so boring.”
But then I figured maybe no one would notice? I apologize for underestimating you all… It won’t happen again.
xoxo
May 6, 2014 @ 10:07 am
Nice to see Elvis supervising!
May 6, 2014 @ 12:07 pm
We love Elvis! Unfortunately, I do better with cats than plants, but I’ll share with my gardening friends!
May 6, 2014 @ 10:07 am
Look! You grew an Elvis! Now that’s a seedling I can get behind.
May 6, 2014 @ 2:22 pm
this is a really cute observation-I noted Elvis in the pic but he does seem omnipresent in their life -he gets about as much camera time as VEB-must be a Ham-wonder where he gets that from?
May 6, 2014 @ 10:26 am
Wow! I love this tute! OK, I love all your posts, really do learn a lot from every single one plus the bonus of additions to my shopping list:) But this one is especially good – I actually printed it AND watched the video, and BONUS, I now have that very clever brick maker on my shopping list. The divot is brilliant. Thank-you tonnes for this – in a growing series of fab posts you’ve always outdone yourself with each new one, and this one is the same!
LOL – “Step One – get your husband.”:):):)
May 6, 2014 @ 10:35 am
Do you remember The Mary Tyler More Show? That repeating gig that she couldn’t throw a descent party? This is me trying to start seeds indoors every year! It has become a family tradition/worry. My boys are very polite about the catastrophe and my long suffering husband (the guy who builds my light contraption ideas every spring) is slow to anger and rich in kindness. (like God) I am not exaggerating – about my husband or seed starting. You have no idea how soul crushing this is to me. Grow plants outdoors? -yes, I can!; plan and maintain elaborate and large outdoors perennial beds? – Check!; transplant and divide – been there, done that!; start seeds indoors – FAIL!. I love your system. I will give it a go next year. I have a question about your lights. I cannot tell from the photos how they are supported? Are they just resting on the container? Tell Paul, he has a soulmate in my husband. You two are adorable and I love your blog!
May 6, 2014 @ 11:17 am
Paul once compared himself to Job. (As in the patience of…)
The lights are just resting on the ends of the bins… But if you are doing something that is going to get tall, you might have to rig them up depending on your timeframe for planting out.
xoxo
May 8, 2014 @ 4:01 pm
Thanks, Victoria! Hey, another question (sorry, but you started it with this terrific post!). When do you start your seeds? In other words, how many weeks do you plan for them to be indoors before planting them out? Thanks!
May 10, 2014 @ 9:42 am
I tend to start early and push the envelope with planting them out. There are two things to consider:
1. For something like zinnia, (similar to tomato,) theoretically you want night temperatures to be reliably at 50°… (which I tend to interpret as flexible, even though it is really not — the plants will not thrive until they have some warmer weather.)
2.Whether you want to pinch them in the house, or outside. It is WAY more convenient to pinch indoors, that way you can be sure you got them all/you are not crawling all over the place in your flower beds. But I do a LOT of zinnia, so convenience might be more of an issue for me than for you… Keeping them indoors too long means you are forcing the plants to grow in what becomes borderline too-little soil. Plus, you have to tolerate them being indoors so much longer.
You can see in the video, after a week they are doing pretty well… I’d give them a good two weeks to really get established? Then, depending on your weather you could start transitioning them outside/hardening them off.
Hope this helps!!
May 12, 2014 @ 5:33 pm
Thank you, Victoria! This is SOOOO helpful. I may stand a chance at success next year. Happy gardening and may all your weeds be wildflowers!
May 8, 2014 @ 11:19 am
I fail in the same way, Liz.
May 6, 2014 @ 10:37 am
This was great! I love having flowers growing through the warm months, it makes the property look so much prettier? and cheers everybody up-at least that’s what passersby tell me when I’m out in front watering, digging planting- etc. I am the person at Lowes just buying the stuff you bring home and stick in the ground so I am really intrigued by your ability to cut out the middle man and have such control over what you grow and the complete process- what a sense of accomplishment with the end result, which in your flower garden is glorious! Thanks again, always interesting info and you have a lovely voice-
May 6, 2014 @ 10:41 am
I wished I had seen this before I planted all my herbs in my “container garden” I live in Florida so do I really have to do all that with the lighting and stuff? I also am upset about the Miracle Grow soil….I was told by the nursery guy at Home Depot it was the best, and I went ahead and used the Moisture Control Miracle Grow Potting Soil. I am in Tears right now, what’s going to happen to my first Herb Container Garden? will it produce aliens or nothing at all? :’-(
May 6, 2014 @ 11:25 am
I would guess that in Florida you can probably do this outside… Your temps are probably perfect way sooner than mine!!
Miracle Gro spends a huge amount of money marketing their stuff, so it’s not surprising they are popular. Don’t let me make you feel bad. I am just an anti-chemical freak… If nothing else, you should get some monster-sized herbs this year!!
May 6, 2014 @ 11:45 am
Thank you Victoria! I will post pictures if I do!! I too, am anti-chemical. I use only organic soil in my vegetable garden…..don’t know what I was thinking when it came to doing this herb container thingy, The directions told me to use “Potting” soil so I guess I was stuck on that! When I obviously have a whole lot of Organic soil sitting in my gargage! :-/ Always learning and starting all over again if it fails!!! :-{
May 6, 2014 @ 10:44 am
Love that block maker! Off to order one ASAP. This was a really helpful post-thanks!
May 6, 2014 @ 11:25 am
From the girl who spent yesterday Googling how to install a synthetic lawn, this looks like too much work.
May 6, 2014 @ 11:47 am
And……..I Definitely am going to look into that soil blocker for my “Florida” winter planting.
May 6, 2014 @ 12:08 pm
Victoria,
This is a great post. Will I get off my lazy read end and actually do it? Probably not. But I am happy to tell everyone I know that enjoys gardening as much as me to check this out. You make it sound so easy.
xo,
Karen
May 6, 2014 @ 12:38 pm
Thanks for this great post. For the fluorescent overhead lighting, I went to home depot and found great/cheap fluorescent lamps. When tried buying the bulbs, I had no idea they had so many different options for the lights, e.g., bright white, cool white, warm white, daylight, daylight deluxe, etc… I ended up getting a few of each… and called it a day.
I am just starting week 3 for my benary zinnias under light… Most of them are growing great, but I still feel far off from pinching. Most have developed their true leaves and just starting to sprout the second set of “true” leaves… Do you know how much longer until I can pinch and put them outside? This is my first time growing and I am clueless. Thanks again for the inspiration.
Best,
Maria
May 6, 2014 @ 6:02 pm
I use fluorescent lights for grow lights, too. The cheap four-foot two-bulb fixtures do great. I put one warm and one cool bulb in mine, to increase the light spectrum cover all my bases. Keep the lights only a couple of inches above your plants at most … fluorescents don’t get hot, so there’s no danger of burning the plants. You can also tent the lights with aluminum foil to reflect even more light to the seedlings.
May 10, 2014 @ 10:16 am
Your seedling’s progress sounds about right… Depending on your weather, you can plant them out first. Then, pinch them whenever they are ready. That way you can get them out of your house, and they can benefit from actual sunlight. (You want your nighttime temperatures to be about 50°, although I tend to stretch that)
It is more convenient to pinch them all at once in the tray, but if they are able to get planted outside, and the weather is right, they will really take off.
May 6, 2014 @ 1:32 pm
I use a recycled styrofoam tray called a speedling. I don’t know about putting florescent lights directly on top of it, but it has worked in the kitchen under the under-the-cabinet mounted florescent lights and also just in the greenhouse outside. I’ve had it for more than 10 years and it’s just showing a bit of wear on the edges now. Either way isn’t exactly mess proof, but the speedling does allow for excellent drainage if it’s raised above the ground/plastic drain tray and you can see the roots when they’ve grown out the bottom and ready for transplanting. It comes in various cell sizes. I use this one http://www.groworganic.com/speedling-transplant-tray-72-cell.html and have no relationship with the company or supplier. Just a fan! Although I just realized with the speedling tray I have to make my own seed dibbler 🙂
May 10, 2014 @ 10:12 am
Interesting!! I’d never seen one of those.
May 6, 2014 @ 1:38 pm
I’m so jealous… Elvis doesn’t eat the plants? NOTHING green is allowed to reside unmolested here… even plastic plants get chewed, just in case we’re trying to pull something :/
May 6, 2014 @ 1:44 pm
Love this blog, Wished I had seen it several summers ago. My husband is a Miracle Grow fanatic and every year our veggies do not do well. I’m going to show him this blog … and hopefully … get great veggies and flowers. Knowing him, he will have set in the garden when I’m on a trip (I just know he’s planning it that way) and will have to wait ’til next year to do this. Again, thanks. This is a keeper blog.
May 6, 2014 @ 2:45 pm
I love this, I love you and I loved the block maker. Need this pronto in Buenos Aires! Thanks for sharing.
May 6, 2014 @ 2:55 pm
This is great, however, I really need a method for growing plants that requires no work. Do you have one of those?
May 6, 2014 @ 5:54 pm
Well Hello There;
What a surprise post – I am not much of a gardener so will need to store and read and re-read this post. But – I wonder about this post as is quite unlike previous postings. Big question now on an unrelated topic – What do you think of the progression of the new season of Mad Men episodes and the new movie by our darling hero? Like you I am also a huge fan. Thank you for a wonderful blog, I look forward to your upcoming book, when? Kate
May 10, 2014 @ 10:21 am
In a rare display of delayed gratification, I wait until ALL the Mad Men episodes have aired… Then, I binge watch them all.
I CANNOT tolerate waiting every week to find out what happens. I find it FAR more satisfying to shove 12 hours worth of Don Draper into my head in a short period of time.
May 8, 2014 @ 11:15 am
Amen on nixing the Miracle-Gro!!
May 10, 2014 @ 12:44 pm
Completely off topic I need an answer to an icky problem I am dealing with and considering this blogger and her fans are the smartest people I have encountered in Bloggerville does anyone have a suggestion for dealing with a greasy kitchen ceiling that I want to repaint? It is shiny white? dubious description- and I have tried to clean it but it would probably need sanding too? or not? I’m a senior and I know I can’t keep my shoulder joints in the required position long enough to get the whole 13×16 thing clean. I tried cleaning services and either got “we don’t do ceilings” delivered in a tone that suggested I had asked them to pick up a dead rat, or a price that would cover a weekend in a 4 star hotel. all answers much appreciated. Its not filthy just not spic & span clean……….. thanks