Designing our custom kitchen sink.
I took all of my 87,952 ideas to the sink fabricator— drawings, browser tabs, saved images… I showed them to him and explained how I intend to mash them all together into one sink of glory and practical fanciness.
View this post on Instagram
Sink guy was like hmmm, ok… hmmm, let me think… hmmm, I don’t know about this piece here… OH! hmmm! yes, ok! that IS a solution… hmm! Maybe we can do all of that! wow! this is really a smart design!
Paul’s eyes rolled back in his head.
He literally cannot stand to have my genius acknowledged.
Much like the 1984 movie, Amadeus.
I am Mozart.
(obviously)
Paul is the other guy— the disgruntled one with the boring wig who does not understand why people are like: HAVE YOU SEEN MOZART’S SINK!?!
note: I cannot find photos for exactly what lives in my head– a mitered stone (or brass) sink that runs fully front-to-back of an extra-deep kitchen cabinet… I started making this thing to show you, but the scale is wrong and it was too boring to fix, use your imagination.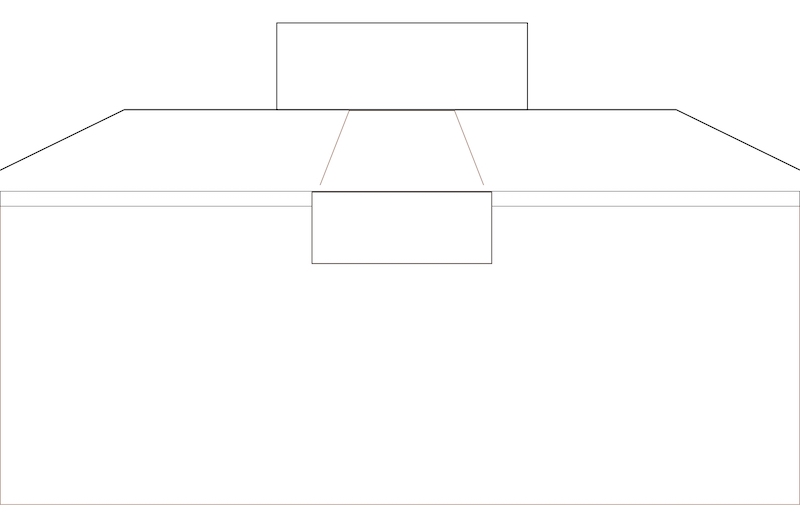
Before I get into the details I need help figuring out, here are things to understand:
1. Our sink and counters will be the marble slabs we salvaged (yes, we also have pool table slate, but have ruled this out now that we are doing dark cabinets.)
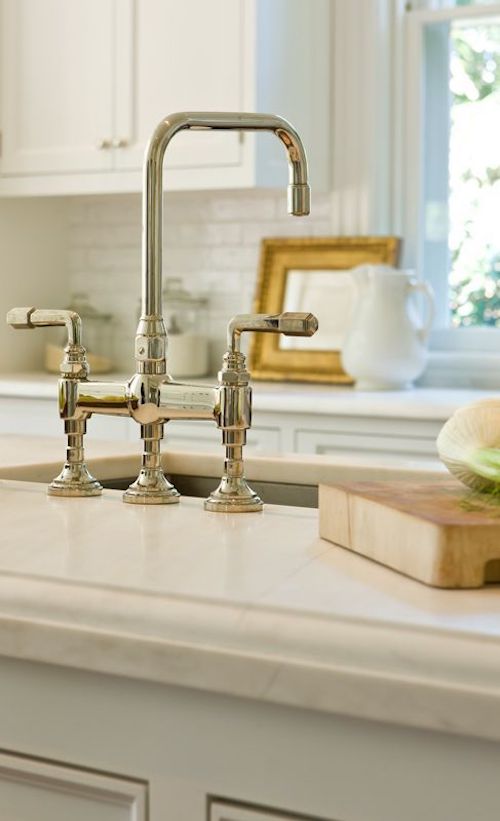
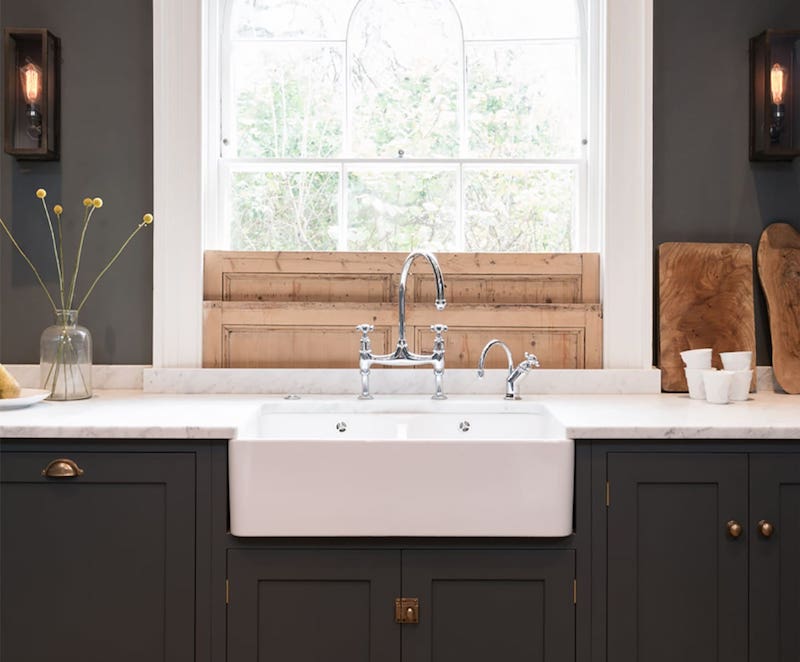
2. The sink will be fully integrated with mitered seams and a wall-mount faucet… (yes, we were planning a Kohler sink, I bought one on craigslist, which I’ve since re-sold.)
3. The sink will be constructed to use ALL of the sink cabinet… once you think it through, you realize this space exists either way… WHY NOT USE IT?
A traditional sink has an internal basin size, front-to-back of about 17″… unless it’s fireclay, the extra-thick walls further reduce that measurement to 15″; I wrote a post here about why we decided against fireclay, even though I love it visually.
4. Traditional kitchen counters are 24”, front-to-back; ours will be 30” — here is the post explaining how we are doing extra deep cabinets.
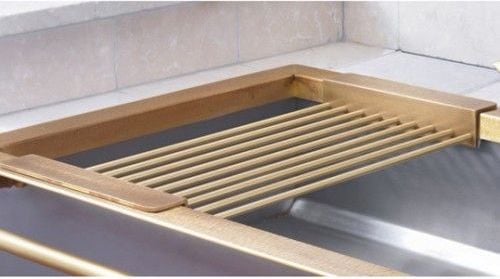
5. The extra space will allow us to have some kind of dish rack across the back… I love the idea of custom brass, but $$$ so probably I will just use the cheap roll-up style.
Next: faucet.
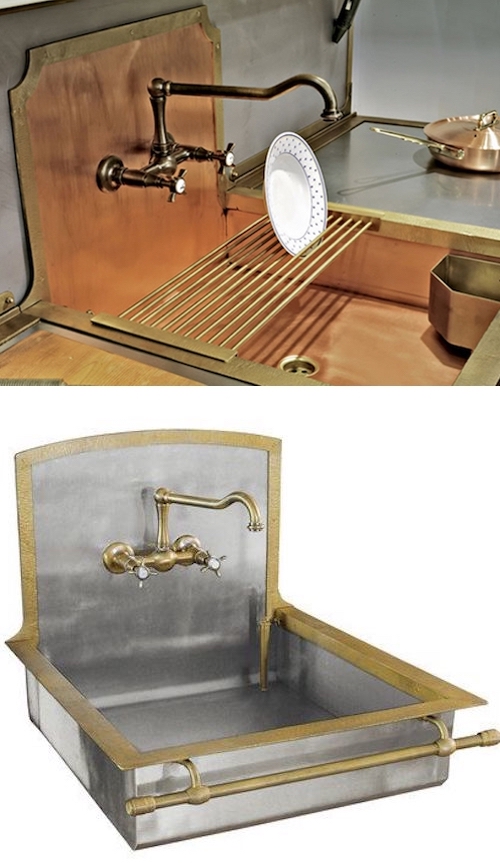
The extra sink space is nice and all, but the part I am REALLY excited about is the faucet it forces us to use.
Paul was man-fast to be all— NOPE. A SINK THAT LONG WON’T WORK. NO FAUCET EXISTS. NEED TO REACH 2” FROM CENTER. GUESS WE HAVE TO USE REGULAR SINK. TOO BAD OH WELL.
Self was all, HAVE A SEAT.
Watch the presentation.
Bro.
I designed the sink like this so that we are FORCED to use MY ULTIMATE FAUCET FANTASY… yes, it’s insanely expensive… but it’s SO GOOD.
Self and I fistbump this like 17 times a day.
BEHOLD.
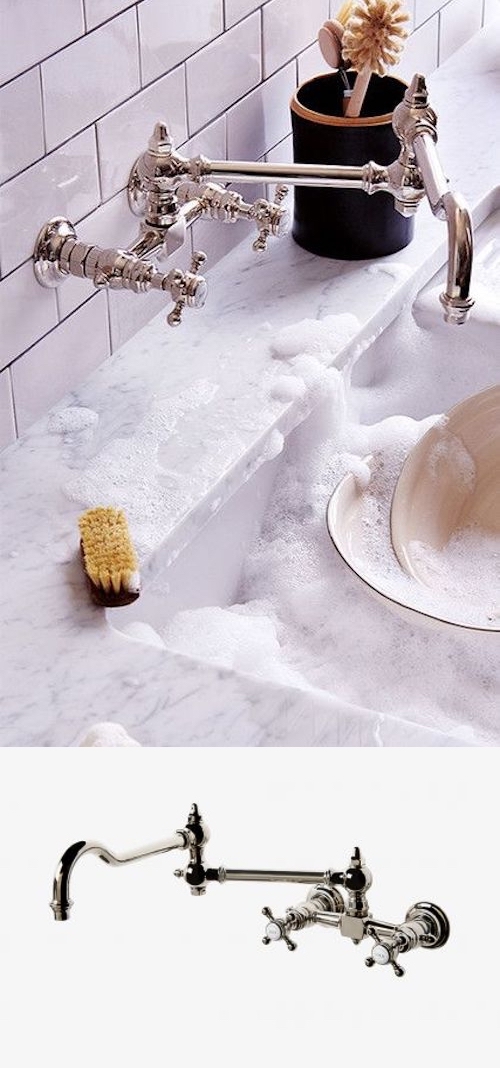
Also, we are going to add the footswitch that lets you do water HANDS-FREE! If you have messy hands, use your feet! It works with ANY faucet and comes as a thin vertical bar, or as a pedal-type thing.
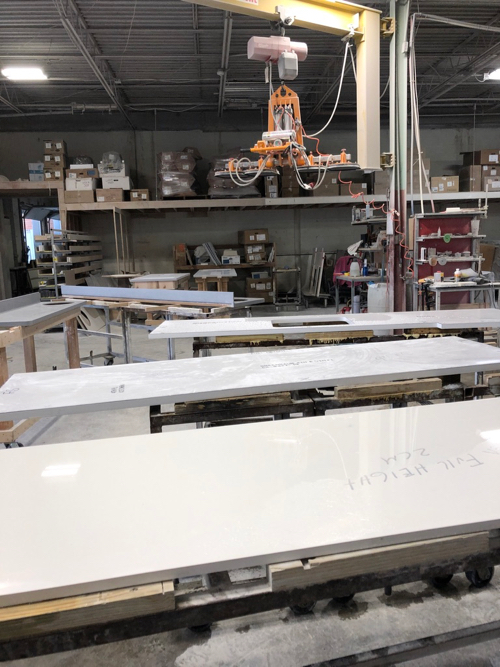
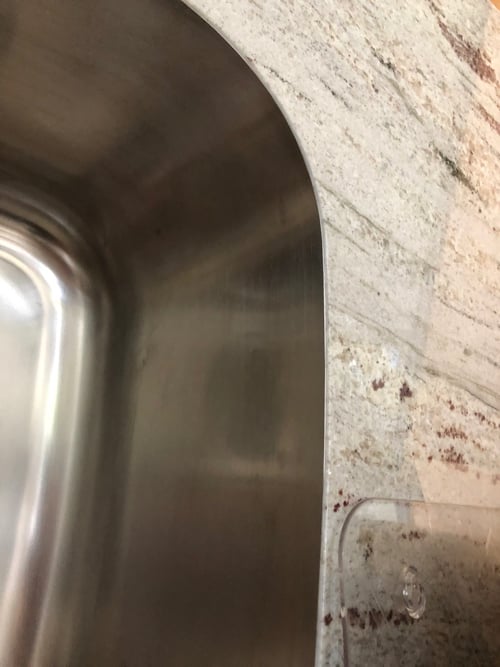
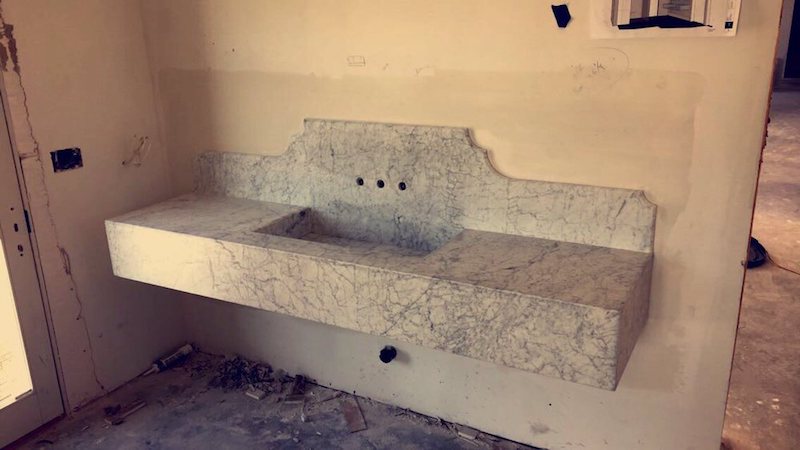
Alsoalso, I should mention that there IS a superior traditional/stainless sink– it is DRAMATICALLY less seamy than traditional seam… the meeting of the materials is fantastic!
I saw it at the sink fabricator, have a look:
Ok.
Now you understand everything I am certain of: a mitered stone sink that runs fully front-to-back of an extra deep kitchen cabinet.
Three sides of the sink are good to go, but I am still figuring out the apron– this is what I am stuck on: the front of the sink and how it is meeting the surrounding planes.
It becomes problematic if some lunatic I want to add a fancy edge to the stone countertop; a laminated edge (not to be confused with laminate countertops), is an extra piece of stone, stacked and glued and polished to be seamless, so that it LOOKS like your countertop is extra thick, but actually it’s just the edge… you do not want extra weight on your countertop.
I wrote an entire post about fancy countertop edges.
Usually, the decorative edge goes on top, but I think I prefer it below… why eat into the usable countertop space?

Either way, I prefer the thicker countertop… BUT this creates a new difficulty– how does it connect to the front of the sink, if it’s not all just one flush plane?
Let me show you a bunch of photos to explain.
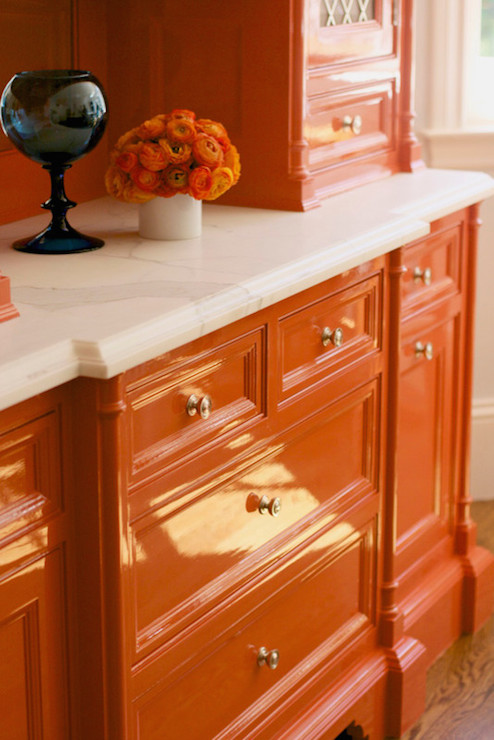
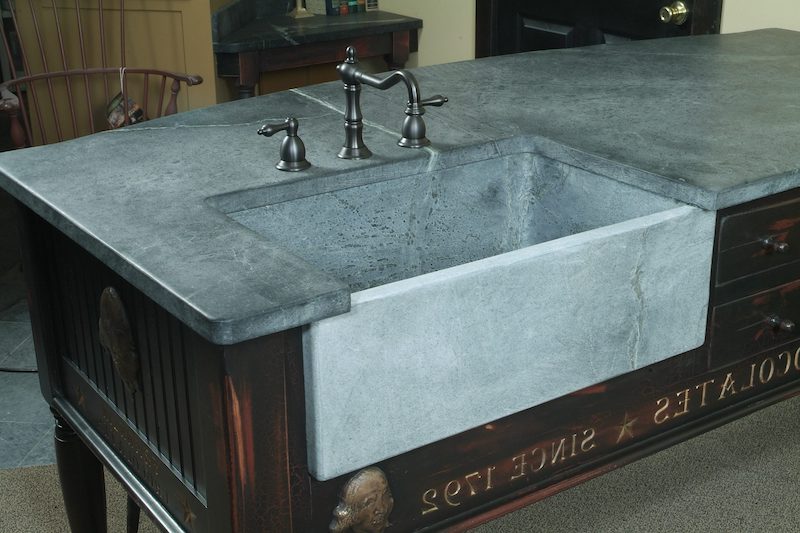
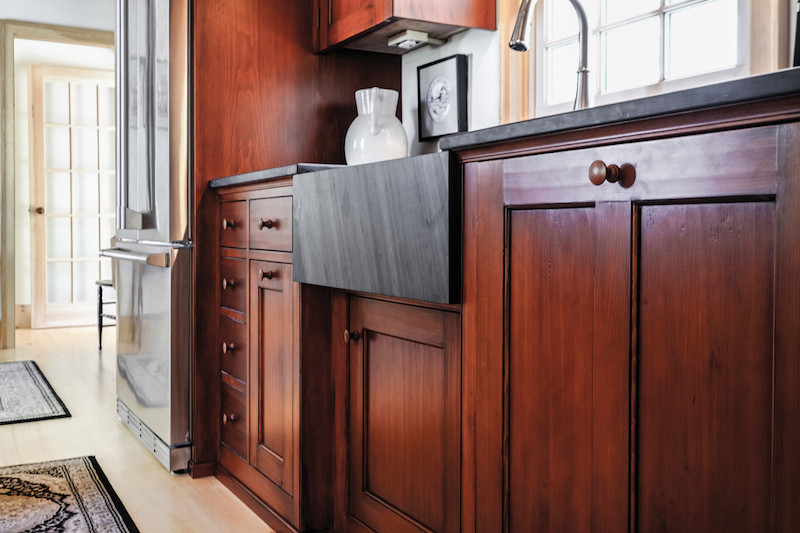
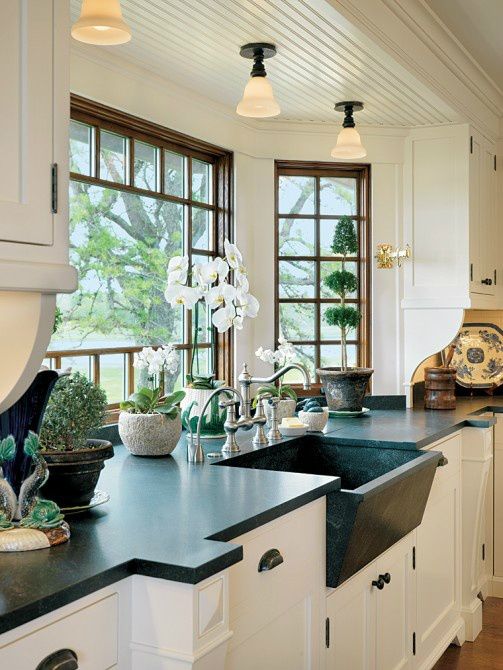
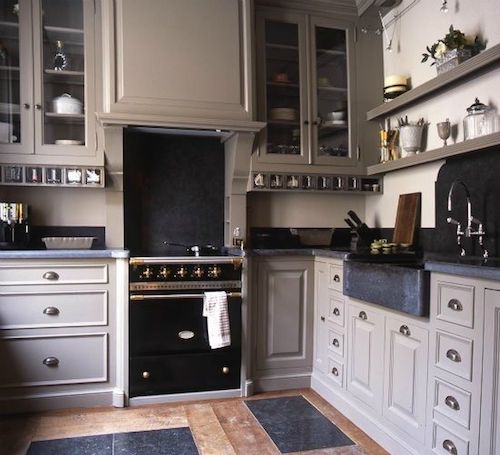
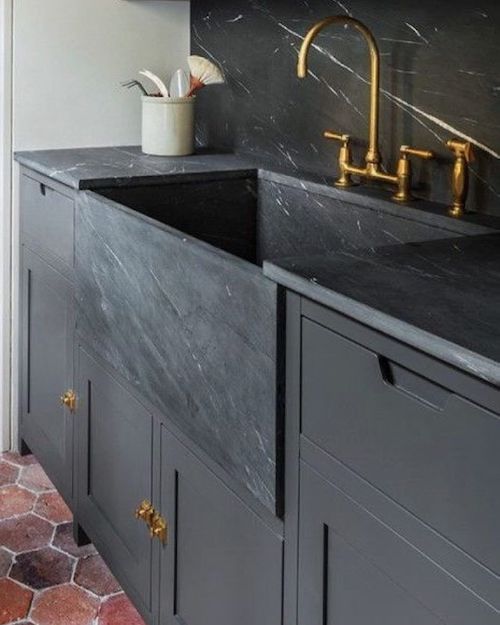
Reminder: we will miter the sink top/edge… meaning, there will be no clear separation between sides of sink and countertop– you can see what I am describing in the two photos below– first is mitered, second is countertop stacked on top of the separate sink… there are good reasons to choose a separate block sink! Mitered is just my visual preference– I hate seams.
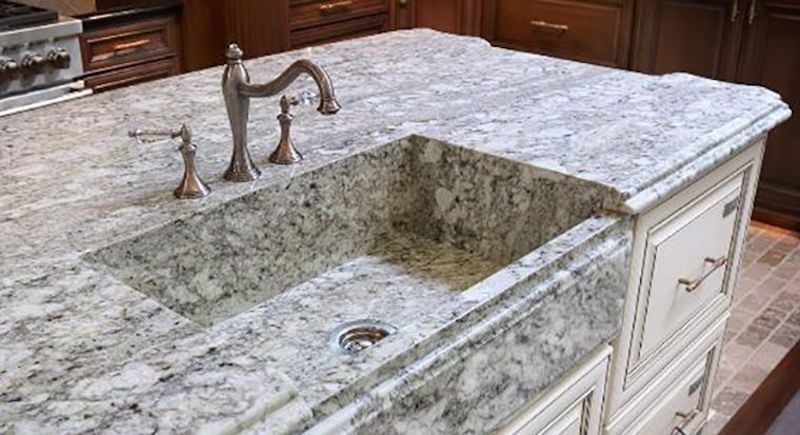
The issue for me, in both photos above, is where the edge-of-countertop meets front-of-apron I prefer NO stack.
I’d like to keep it as seamless as possible, which is fine and doable… unless we are adding an extra decorative counter piece – it is going to need to butt into the side of the sink.
Again, more photos to demonstrate… below, PRETEND this first one is a sink where the marble apron is… you see how seamless that could be. IF NO FANCY COUNTER PIECES ON EITHER SIDE.

I like seamless! But to re-explain my problem: you can see in the two photos above that there is no place to add an under-counter-trim-piece.
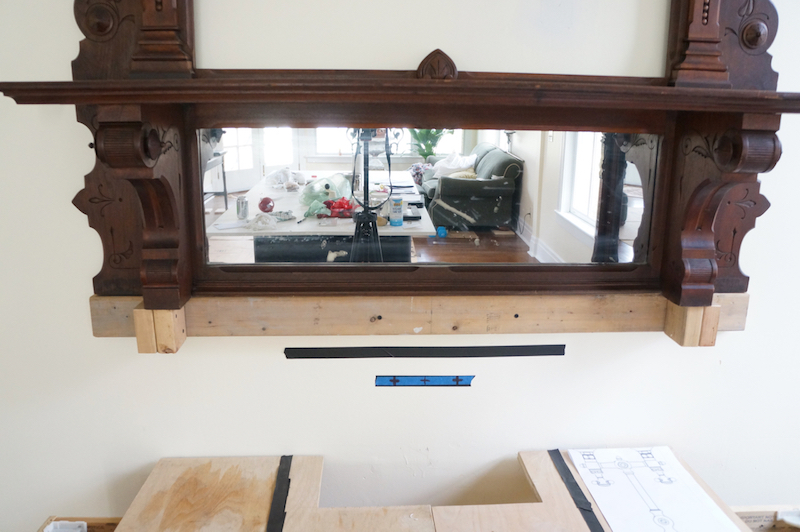
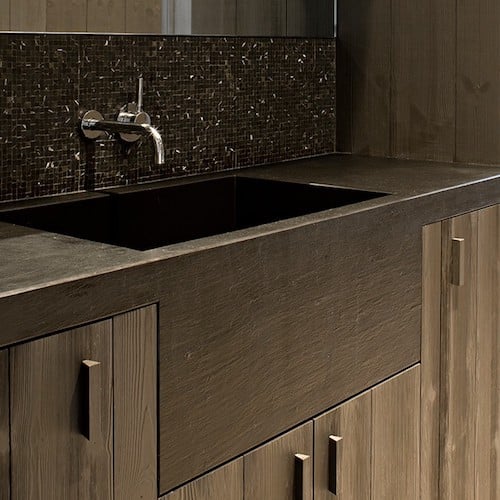
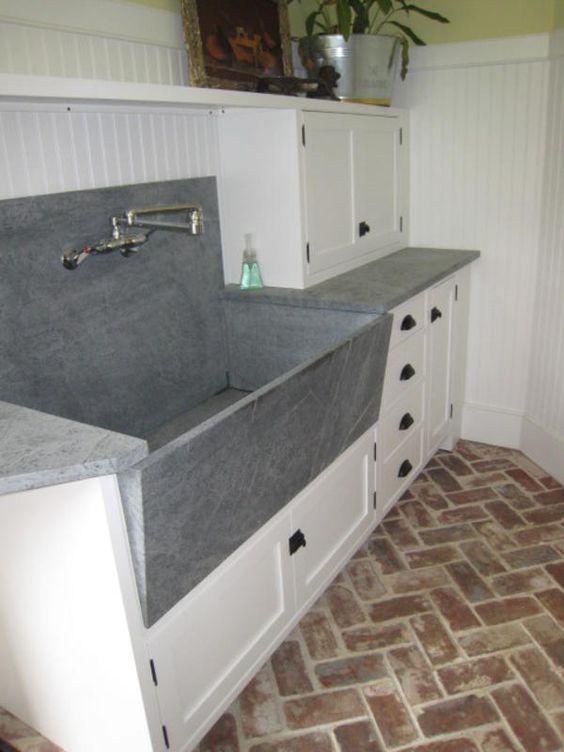
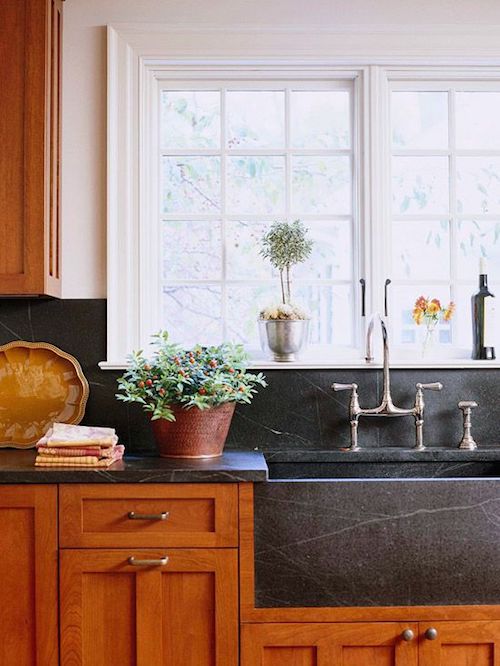
In the photo below, if you look closely at the detail piece under their counter– theirs is wood, but if you imagine it as stone, you will see what I mean about dead-ending into side of sink?
That’s an option IF we bump the sink apron out… which, of course, I hate.
Also I hate running the fancy across sink apron/lip; why? I don’t know. I just work here.
The other option is to slant the apron (like below)… which Paul hates– why reduce the interior usable sink space?
So. I do not love any of our options, which would push me towards seamless, BUT for this detail: I LOATHE a toe kick. Visually. So much.
I want the cabinets to look like built-in furniture so adding the volume at the top is theoretically helpful, ASSUMING I can figure out a connection I like.
So.
That’s where we are… fidgeting with details and saying– what about like this, what about like that? It’s DEEPLY irritating but for some reason, I am not permitted to just flip a coin.
Here are some more photos that are not quite right for me but I think you would like to see.


June 27, 2019 @ 4:58 pm
I love, love, love you’re wall mounted faucet! It’s perfect!
June 27, 2019 @ 5:09 pm
My friend just remodeled her kitchen and went with 2 dishwashers and uses one just to drip dry dishes (that one is a little smaller than the washing one.) Both are plumbed if she ever wants to use it as a washer too. Either way, no visible dishes drying anywhere. The dishwasher was actually cheaper than a cabinet too, so win-win. I’m super jealous.
June 27, 2019 @ 8:06 pm
Love the wall-mounted faucet, too! I really think — since you’re creating this kitchen from parts so to speak — that you would be well-advised to calculate the countertop heights and the sink depth based on YOU — the height of the cook! IIRC, an ideal countertop for most kitchen work should be about four inches lower than elbow height of the standing cook — a bit lower than that if you knead bread (a baking center, if there is one). This was my first find when googling “kitchen sink ergonomics” but in general, the deeper the sink, the less ergonomically good it is — you’re bending to work in it, and you do most of the “work” at the bottom of the sink! It’s easy to mount things at an ideal height NOW but hard to change them later.
Update on kittens?
https://architizer.com/blog/practice/details/ergonomic-kitchen-sink/
June 28, 2019 @ 1:44 am
You are winning. At life. At kitchen design. At subtle husband manipulation and control. All of it.
And when can we talk about your hair? That’s like a whole post on its own. Gorgeous.
But i digress. You’re winning.
Can’t wait to see the end result.
June 28, 2019 @ 9:15 am
Instead of the metal rack at the back of your sink to dry dishes on, why not have Paul make a slatted wooden or bamboo one. I think it would be less slippery for the washed items and more organic. Or one with wood sides with brass or copper rods, if you prefer the metal look.
June 28, 2019 @ 10:00 am
What is the desired overhang for counter to extend beyond cabinet fronts?
I ask b/c what if… in that that ‘pretend sink’ apron front towel rack image, you overhang counters at least 3/4″. Then you design a similar furniture leg-style cabinet. However if the legs bump out from the cabinet faces far enough to conceal ends of any decorative edge, then you could terminate there. Run decorative profile up to legs. You would have almost no overhang where the leg-post-things are, but it would allow for tidiness in seams near sink. Fanciness book-ended by two furniture style legs. (I would not personally want to alter the countertop shape from rectangular to accommodate huge leg bump outs… not a fan… but that could be a route as well.)
June 28, 2019 @ 2:36 pm
What about an apron that extends the full length of the counter/cabinet? I pinned this photo when I was re-doing my kitchen but didn’t do it= my layout with the location of the dishwasher didn’t allow it. I love my kitchen, but still go back to admire the full apron photo that I pinned from time to time 🙂 Different from your fancy edge, but would give the counter a weightier look. Could probably still do a fancy edge under that apron if you wanted to . https://www.pinterest.com/pin/144889312983274064/
I am sure that it will be beautiful no matter what you decide. As a professional in the chiropractic field, I can confidently report that if you do need to reach down into the extra deep sink, your back will be fine if you bend by hinging at the hips while keeping your spine straight, and do not bend or hunch your spine (like most Americans do.
June 29, 2019 @ 5:01 pm
1. You really, really need a toe kick. As someone who lived with early 20th c. cabinets with no toe kick, it is a drag to twist your feet sideways while doing ordinary counter/cupboard tasks. ESPECIALLY washing dishes.
2. While you are considering the front to back sink measurement, have you considered the depth of the sink as it pertains to your and your husband’s height/arm length ? I lived with a crummy SS sink that was here when I moved in, and despite being a 5’7″ woman, the height of the sink bottom (28″ to the floor) made me stand in a way that gave me a backache every time I washed dishes. When I renovated the kitchen, I used a salvaged antique wall hung sink, and had it installed so the measurement from the floor to the bottom of the sink was 32″. This was such an improvement. It looked a little odd at first, and the plumber quizzed me a couple of times before he understood that I understood this was an unusual request. This height made the sink so much more functional for me. If I was going to do it again I might even bump it up another inch or two.
3. You haven’t mentioned your counter heights, but what is “standard” may be less suitable for taller people. Personally I prefer a work surface that is 36″ tall or taller. Not having to hunch over while chopping or prepping is much more comfortable.
June 29, 2019 @ 7:46 pm
Those dish racks could be custom built in a few hours by someone who has access to the right tools. Two pieces of angle iron for the ends that rest on the edges of the sink, with pilot holes drilled through at regular intervals on each one. Then rod with threaded holes to match the thread on brass machine screws. Brass is quite soft, so you could do it yourself with a hacksaw with a metal blade, a fine tooth file, and a tap and die set.
June 29, 2019 @ 7:49 pm
Oh, and a drill, centre punch, drill bit and countersink bit.
June 30, 2019 @ 11:45 pm
Hmmm… I am sure whatever you pick will be gorgeous. You have a lot of thought into this particular sink. So….if you want an unkitchen….and you want the countertop/cabinets to look like furniture….then maybe forget about the apron front portion of the show….so if you sat on the floor and looked at the cabinets and countertops…the laminate plus countertop will be exactly the same all the way across. This would give you a very clean line… Since I am not so sure you can give up on the apron front (hey if I had multiple slabs of marble I would want to show it off, too!) …maybe you should try looking at crown moulding ends and corners for inspiration. Like so …https://www.askthebuilder.com/installing-fancy-crown-molding-corners/ You may have said and I missed it…but will the apron front extend beyond the counter? Or will it be even? Or recessed? I did not love the angled front… If the front will be even with the edge of the countertop…you could run the under edge all the way around the apron…. just like you would with moulding… Good luck and I am really looking forward to seeing the results!
July 1, 2019 @ 5:57 pm
Three pages of ideas at this link, not all have decorative detail on the sinks but an awful lot do. https://www.ancientsurfaces.com/Antique-Sinks.html
July 5, 2019 @ 9:03 am
Since you’re going for a built-in furniture look, maybe looking at some old bars would provide inspiration? They are pretty much hulking pieces of built-in furniture and some are so beautiful. Sometimes they do things around where the servers pick up drinks that look and work well, instead of a clutsy retrofit…
July 23, 2019 @ 1:48 pm
My deep farm sink never strains my back because I raised the counters 4 inches. I’m 5’7″ so its not that I’m real tall but I do not like a lot of bending over so the 4 inches is a welcome gift. My contractor said,”Good idea” and now he suggests it to his other kitchen remodelers.
July 24, 2019 @ 9:17 pm
Your dream faucet is on sale for $600 at waterworks warehouse sale today.
August 7, 2019 @ 4:51 pm
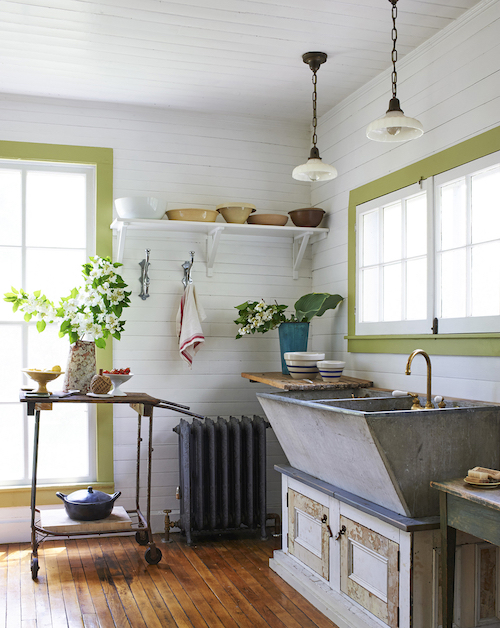
The sink in the very last photo is may favorite of them all. I want that sink from craigslist in a “for free to whomever is willing to come take it off the wall” type of situation.
November 29, 2019 @ 10:27 am
Would it be possible for the toe kick to be hidden under the lip of the lower cabinet? It’s not like you need to see it when you use it.
March 18, 2021 @ 9:58 am
Do you happen to have the design you used for the large grey sink? It looks like it may be in a laundry room (blue hand soap, white cabinets, red brink floor)? I am looking for an oversized sink to use as a dog bath…but everything that is prefabricated is smaller than I am wanting. If you have a drawing of the design, would you be willing to share it with me? I would love to have something to take to a fabricator to get started with.