Antique garden urn restoration – how to make a latex mold to duplicate missing fancy pieces.
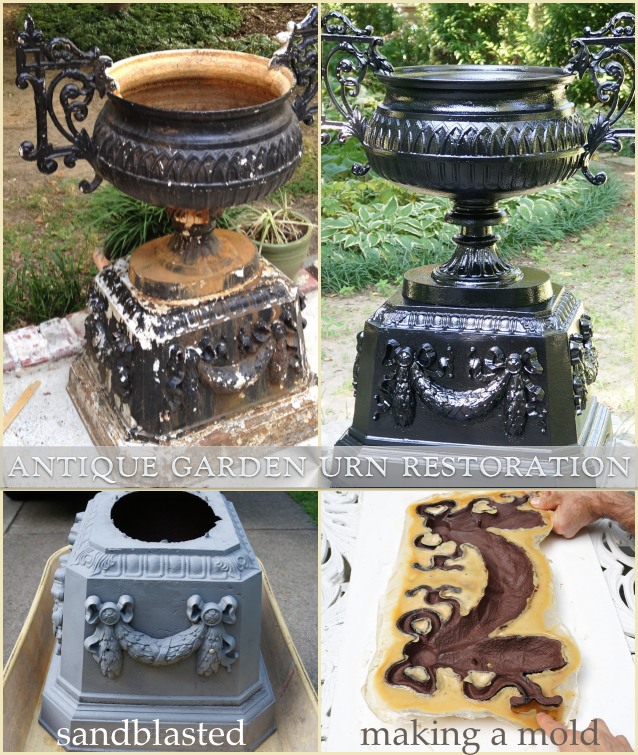
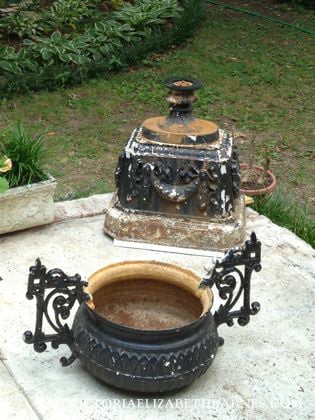
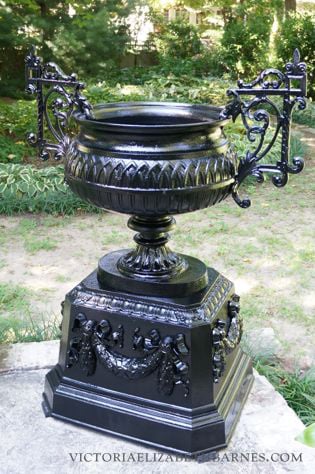
I got this antique, cast-iron garden urn on Craigslist. It was made in Philadelphia, probably around 1890, and is stamped – Adams and Storrie. (There is a little bit of history of their iron foundry at the end of my original post.)
At the time, I hadn’t been blogging very long so I did not think to take screenshots of the Craigslist ad, but the drawing (with measurements,) in the original post was all that was pictured. The guy wanted $200, which we paid. Paul tried to get him to come down in price, and I was like– please, we’re practically stealing this. Pay the man before the police show up.
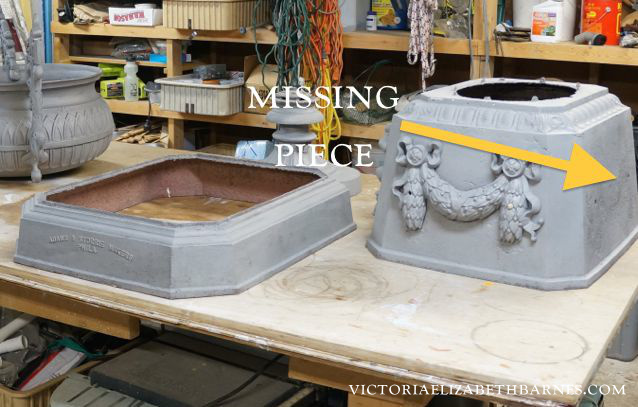
It had some issues– rust, layers of paint, and one of the decorative floral swags on the base was missing… As far as I was concerned, it was perfect.
I would have allowed its continued decomposition, but it turns out that Paul does not have my steely constitution for watching the death of an urn. It bothered him that the rust-situation was being permitted to progress unchecked.
Even though neither of us wanted to get involved in a restoration, there was really no way to fix the rust without stripping it down to the base metal… and if we were going to go that far, we might as well do a really good job.
I cannot overstate how much paint was on this thing… Black paint on top, white underneath, some green underneath all of that, rust all over.
This was not a job for paint stripper and a wire brush — trying to get something this ornate with the scrolls and divots truly clean would have been a fool’s errand. So we took it to be sandblasted.
Below is when we picked it up after sandblasting. That gray color is not a primer, that is the base metal. It indicates a high amount of alloy, (*or something.)
*From now on, whenever metallurgy, chemistry, or electromagnetic fields are discussed, please assume there is a “or something” tacked on the end of it.
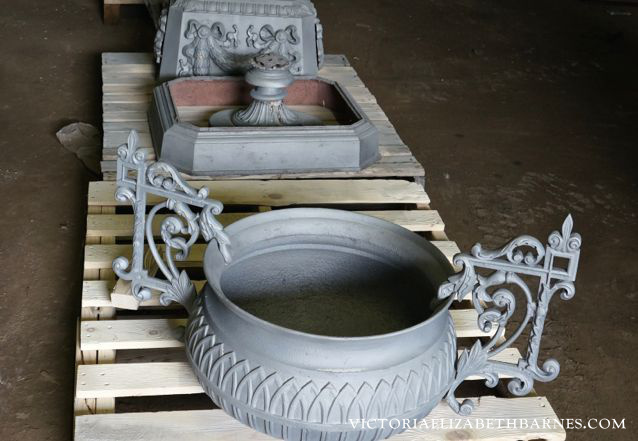
As I’ve collected it, I have had all of our patio/porch furniture sandblasted and then powder coated— powder coating is a process where first the item is sandblasted to remove all the old paint down to the bare metal. Then, the item is coated in a dry powder that is electrically charged, (*or something,) so that it clings to the metal. The powder is cured under heat and gives a very solid surface, like a car.
Depending on the metal, your results should be excellent, and generally I think the expense is worth it. For the urn though, the price to just have it sandblasted was huge. There is so much surface area to the pieces, and there was SO much paint/rust.
We ended up paying almost as much to have it sandblasted as we did to acquire it. At that point, having it powder coated felt like it would defeat the purpose of getting it cheaply to begin with.
On top of the expense, the other item I have had powder coated that was similar to the urn’s metallurgical composition, (*or something,) is also the one thing I have not been satisfied with the powder coating’s resiliency.
So between the expense and my uncertainty that I would be satisfied a few years from now, we decided to paint it ourselves.
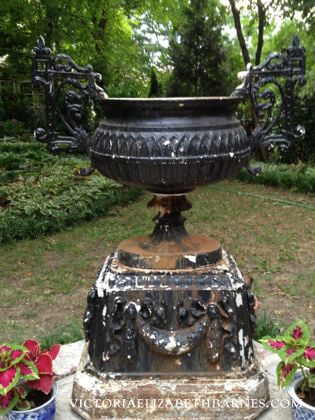
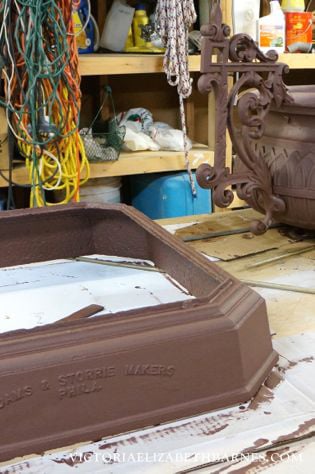
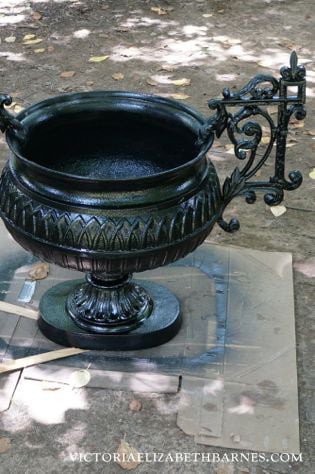
The first thing we did was paint everything with two coats of RustOleum primer. We had a quart of it and used a paintbrush to apply it. (Let it dry well in between coats.) Then we sprayed it with two coats of black gloss.
It has been outside for eight months now, and it still looks perfect. The key to a paint job lasting is making sure you are starting with a very clean surface. If you have anything loose or flaking, water will get in there and destroy all your hard work.
Now for the fun part – duplicating the missing, decorative floral-swag.
You need four things for this:
1. liquid latex/rubber mold maker.
2. a flat, slick surface that the latex will easily peel off.
3. paintbrush.
4. patience.
The latex is very thick, so you aren’t so much painting it on as you are glopping it on… It is going to take you a while to get enough coats of latex on whatever it is you are making a mold of. You need it to be sturdy, so more latex is better. You also want to let it dry thoroughly between coats.
I forget how many coats we did, but we went through two bottles of the latex mold stuff.
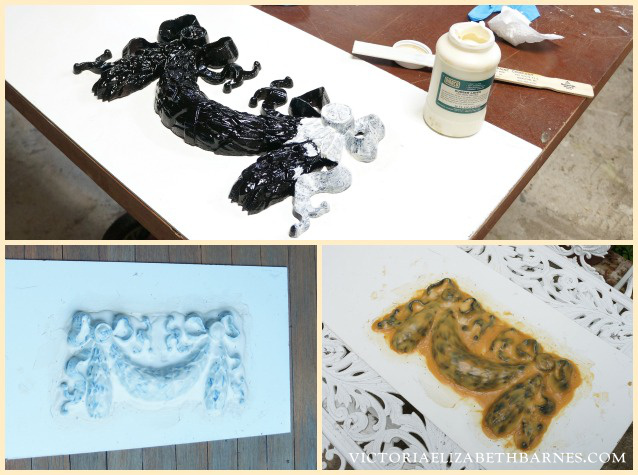
Once you have enough coats and it’s completely dry, it is time to peel the latex off. We used a window scraper to loosen the edges. Once we got it started, it peeled right off the white plastic board we used as a base.
When you start removing the mold from the actual piece you are duplicating, take your time. Be sure you are not ripping or tearing your mold.
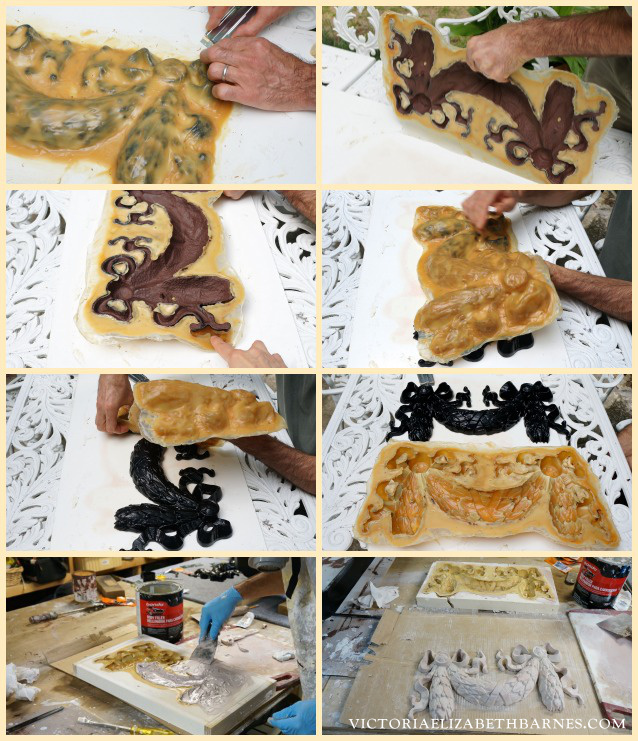
Once you have your latex mold, you need to stabilize it before you fill it. I guess if your mold was for something very small, it would not be a big deal. But because this swag was pretty sizable, we wanted to be sure that there was no movement while filling it.
This part was a little tricky. Ideally, we would have stabilized it before removing it from the original to be sure that it stayed in the identical shape, but there was no way to remove the latex without bending/moving it.
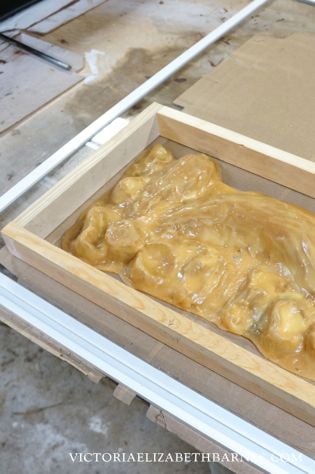
We ended up placing the freed-mold open-side-down on a piece of glass. Then Paul built a frame around it and filled the frame with plaster.
The glass let us look at the mold from underneath, to be sure all the edges were flat and everything looked proportionate before filling the frame with plaster.
Once the plaster was dry, we had a very sturdy mold.

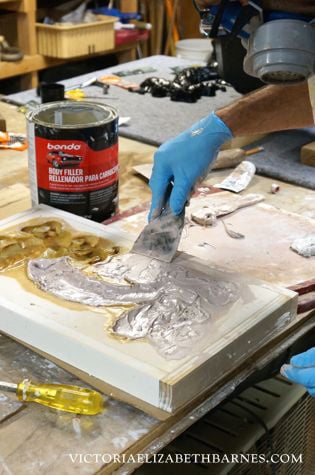
The material we chose to fill it was Bondo— the stuff they use to do body-repair on cars.
It worked perfectly but I will tell you that stuff SMELLS. I am pretty sure it will give you cancer in five seconds… I was out there briefly while Paul was working with it, and I could smell it for the next three days.
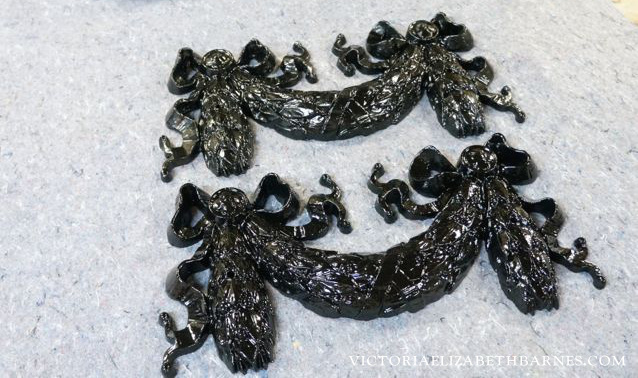
When painted, the two pieces were indistinguishable.
When we were finished, we had Brian come over to admire it. He said – are you going to plant something in it?
I was like – are you kidding? We just spent a month getting this cleaned up. The LAST thing I am going to do is fill it with dirt.
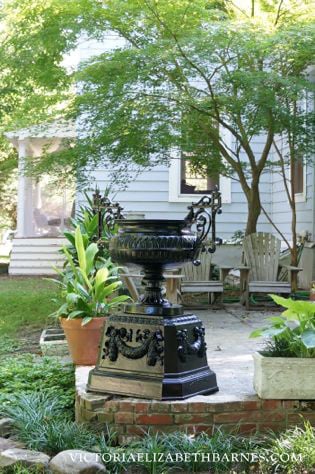
I cannot really say that I like the urn better, now that it looks brand-new. If anything, I kind of like it less. But it was still money well spent because it made me realize that rather than invest in a new patio… It is FAR better to spend money on GFTs and just disguise the patio.
This is what I call a win-win situation: we get to check the patio off our list of things to do. AND we get to buy more giant fancy things. I have no idea why it took me so long to come to this acquisition-justification.


June 22, 2016 @ 7:57 pm
This is such a great post – thanks for sharing your project! I just completed a very basic restoration on a nineteenth-century cast iron statue, but I opted for the wire brush to save some dough and because I wasn’t sure what I would find underneath the paint. I was most intrigued by your pictures of the raw metal color after the sand blast – very cool.
All the best, Zach
http://www.whiteplainsva.com
July 12, 2016 @ 2:38 pm
Paul has a way to make kitchen restoration money (or Craigslist fund ?) with those seats. Make ’em and sell them on E-Bay as antique replication ???
July 12, 2016 @ 2:39 pm
I hate autocorrect -seat was originally “swags” when I typed it. Autocorrect tried to change it again here. ?
July 13, 2016 @ 5:47 pm
If you ever sandblast and have something painted again, go to an auto restoration place and get it done with auto paint. It’s a more durable finish than powder coating. I had my vintage expanded metal patio set spray painted by an auto body guy and it’s great. Finish/rustproof with this great product from Boeing (Paul will love):
https://www.amazon.com/Boeshield-T-9-Waterproof-Lubrication-aerosol/dp/B001447PEK
April 27, 2017 @ 11:21 am
Great job, it really does look new! I’m wondering–how did you get the scroll pieces off the base to make the mold?!
December 5, 2017 @ 5:45 pm
Love, love, love your restoration of the beautiful urn! You two are quite brave to tackle such a difficult task – congratulations.
Would you please let me know where you took it for sandblasting – how did you find a place that specialized in it and where would you have taken it for powder coating if you would not have chosen to paint it yourself?
Your response would be much appreciated.
M. Grotz
December 6, 2017 @ 10:38 am
We took it to Colonial Sandblasting (right near the Ben Franklin, on the Camden side)… we chose them because they had the capacity to do LARGE items… not everyone does! The place I’ve used before for powder coating moved, and I cannot remember their name! But they specialized in vintage patio furniture and I was able to see photos of their previous work.
March 15, 2018 @ 3:30 pm
hello, Did you have to put a release agent in the mold so the bondo would come out and can you reuse the mold?
thank you very much.
A Fan
March 15, 2018 @ 3:57 pm
hey, no we did not use anything between the mold and the bondo… I did see it suggested and passed that info on to Paul, but he ruled no (for no reason other than he wasn’t the one who did the googling, and also trying to convince him of something “because the internet says so” is challenging.) Yes, we could reuse the mold!
July 14, 2020 @ 5:46 pm
Beautiful!! the black is on point 🙂